Integrating Kafka with ClickHouse
Apache Kafka is an open-source distributed event streaming platform used by thousands of companies for high-performance data pipelines, streaming analytics, data integration, and mission-critical applications. In most cases involving Kafka and ClickHouse, users will wish to insert Kafka based data into ClickHouse - although the reverse is supported. Below we outline several options for both use cases, identifying the pros and cons of each approach.
For those who do not have a Kafka instance to hand, we recommend Confluent Cloud, which offers a free tier adequate for testing these examples. For self-managed alternatives, consider the Confluent for Kubernetes or here for non-Kubernetes environments.
Assumptions
- You are familiar with the Kafka fundamentals, such as producers, consumers and topics.
- You have a topic prepared for these examples. We assume all data is stored in Kafka as JSON, although the principles remain the same if using Avro.
- We utilise the excellent kcat (formerly kafkacat) in our examples to publish and consume Kafka data.
- Whilst we reference some python scripts for loading sample data, feel free to adapt the examples to your dataset.
- You are broadly familiar with ClickHouse materialized views.
Choosing an option
When integrating Kafka with ClickHouse, you will need to make early architectural decisions about the high-level approach used. We outline the most common strategies below:
ClickPipes for Kafka (new)
- ClickPipes offers the easiest and most intuitive way to ingest data into ClickHouse Cloud. With support for Apache Kafka and Confluent today, and many more data sources coming soon.
ClickPipes is a native capability of ClickHouse Cloud currently under private preview.
Kafka table engine
- The Kafka table engine provides a Native ClickHouse integration. This table engine pulls data from the source system. This requires ClickHouse to have direct access to Kafka.
Kafka table engine is not supported on ClickHouse Cloud. Please consider one of the following alternatives.
Cloud-based Kafka Connectivity
Confluent Cloud - Confluent platform provides HTTP Sink connector for Confluent Cloud that integrates Apache Kafka with an API via HTTP or HTTPS.
Amazon MSK - support Amazon MSK Connect framework to forward data from Apache Kafka clusters to external systems such as ClickHouse. You can install ClickHouse Kafka Connect on Amazon MSK.
Self-managed Kafka Connectivity
- Kafka Connect - Kafka Connect is a free, open-source component of Apache Kafka® that works as a centralized data hub for simple data integration between Kafka and other data systems. Connectors provide a simple means of scalably and reliably streaming data to and from Kafka. Source Connectors inserts data to Kafka topics from other systems, whilst Sink Connectors delivers data from Kafka topics into other data stores such as ClickHouse.
- Vector - Vector is a vendor agnostic data pipeline. With the ability to read from Kafka, and send events to ClickHouse, this represents a robust integration option.
- JDBC Connect Sink - The Kafka Connect JDBC Sink connector allows you to export data from Kafka topics to any relational database with a JDBC driver
- Custom code - Custom code using respective client libraries for Kafka and ClickHouse may be appropriate cases where custom processing of events is required. This is beyond the scope of this documentation.
Choosing an approach
It comes down to a few decision points:
Connectivity - The Kafka table engine needs to be able to pull from Kafka if ClickHouse is the destination. This requires bi-directional connectivity. If there is a network separation, e.g. ClickHouse is in the Cloud and Kafka is self-managed, you may be hesitant to remove this for compliance and security reasons. (This approach is not currently supported in ClickHouse Cloud.) The Kafka table engine utilizes resources within ClickHouse itself, utilizing threads for the consumers. Placing this resource pressure on ClickHouse may not be possible due to resource constraints, or your architects may prefer a separation of concerns. In this case, tools such as Kafka Connect, which run as a separate process and can be deployed on different hardware may be preferable. This allows the process responsible for pulling Kafka data to be scaled independently of ClickHouse.
Hosting on Cloud - Cloud vendors may set limitations on Kafka components available on their platform. Follow the guide to explore recommended options for each Cloud vendor.
External enrichment - Whilst messages can be manipulated before insertion into ClickHouse, through the use of functions in the select statement of the materialized view, users may prefer to move complex enrichment external to ClickHouse.
Data flow direction - Vector only supports the transfer of data from Kafka to ClickHouse.
Using the Kafka table engine
Kafka table engine is not supported on ClickHouse Cloud. Please consider Kafka Connect or Vector.
Kafka to ClickHouse
To utilise the Kafka table engine, the reader should be broadly familiar with ClickHouse materialized views.
Overview
Initially, we focus on the most common use case: using the Kafka table engine to insert data into ClickHouse from Kafka.
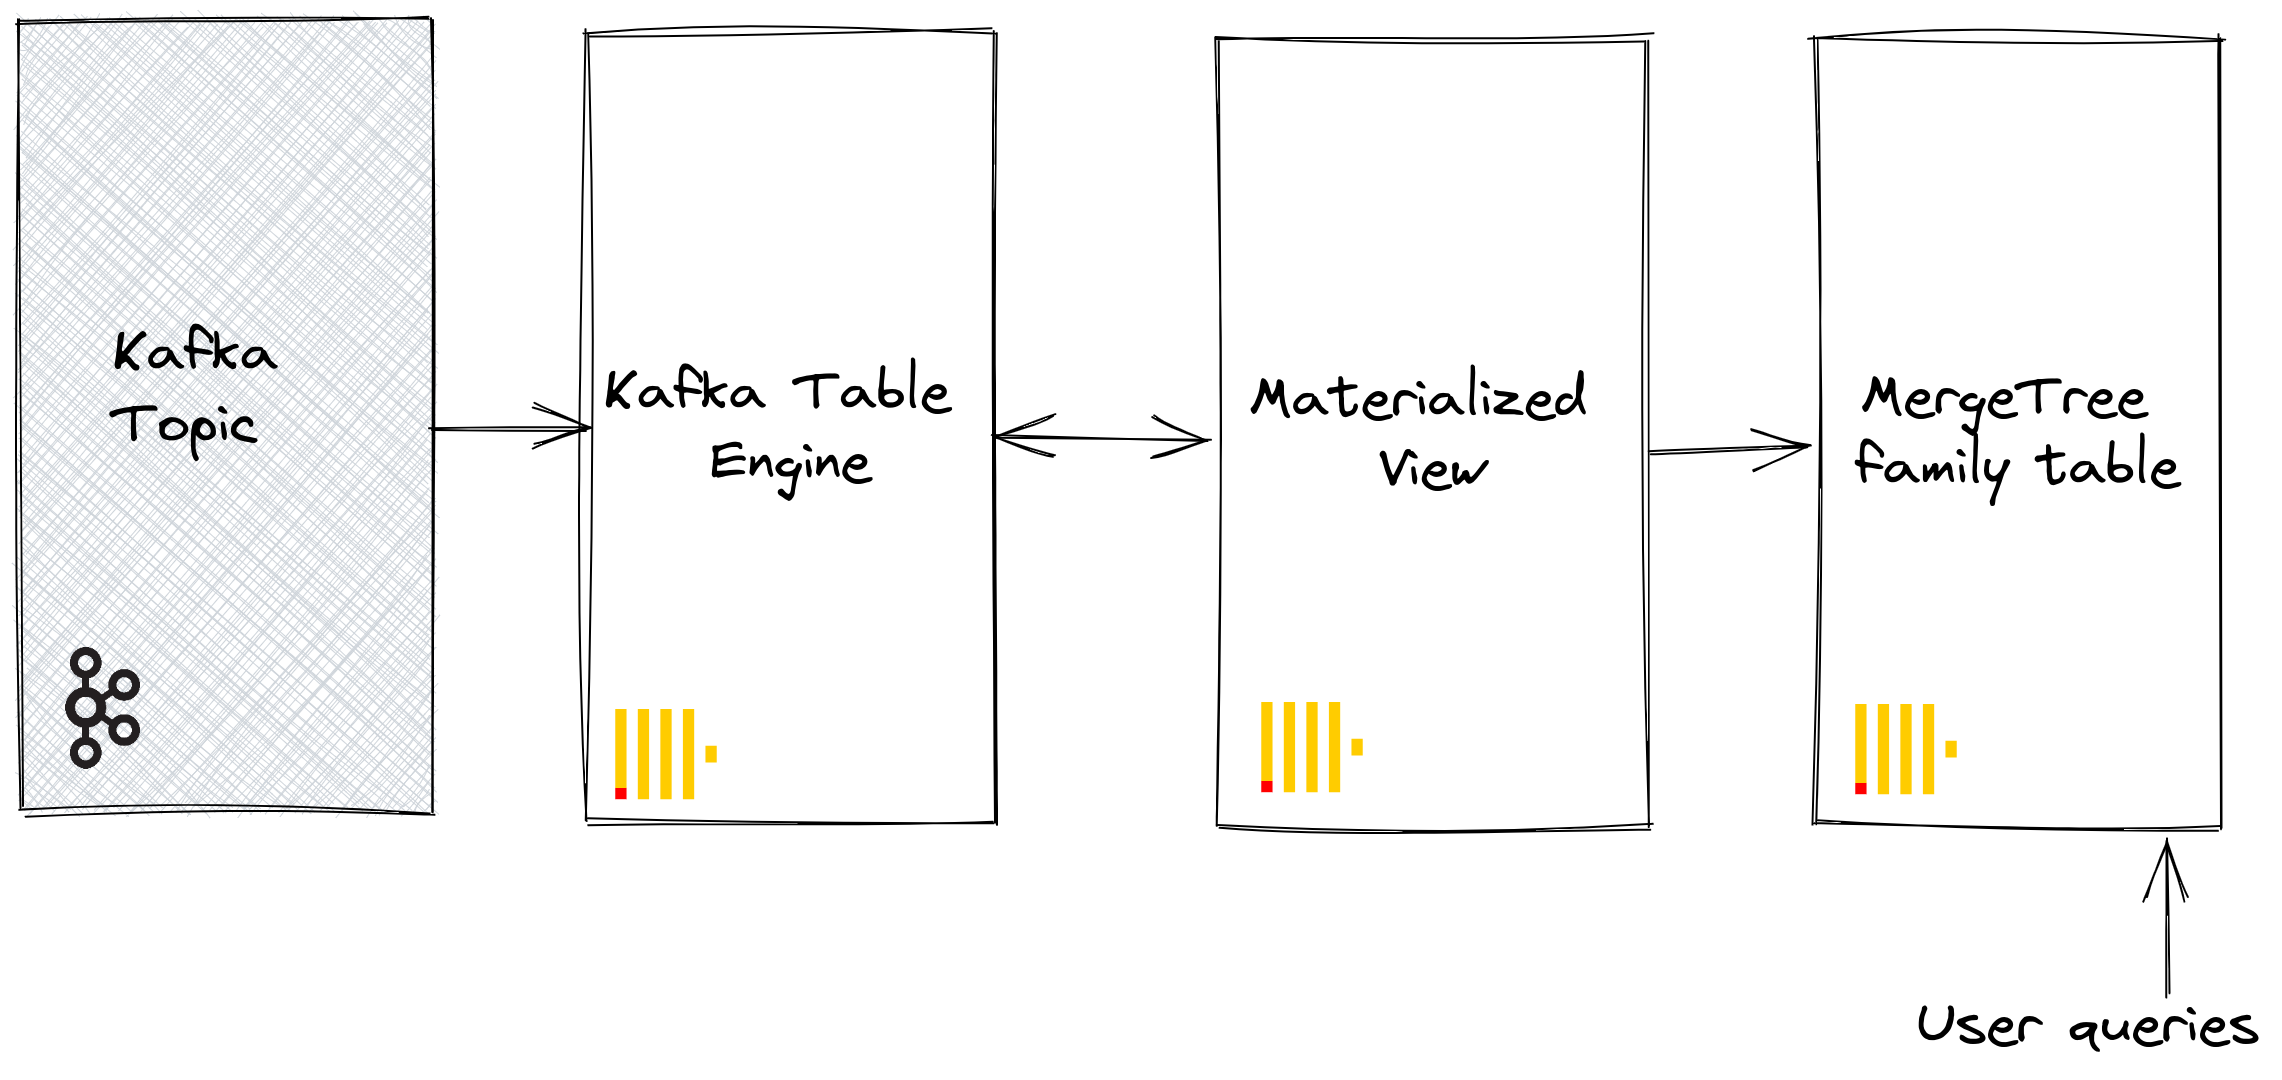
The Kafka table engine allows ClickHouse to read from a Kafka topic directly. Whilst useful for viewing messages on a topic, the engine by design only permits one-time retrieval, i.e. when a query is issued to the table, it consumes data from the queue and increases the consumer offset before returning results to the caller. Data cannot, in effect, be re-read without resetting these offsets.
To persist this data from a read of the table engine, we need a means of capturing the data and inserting it into another table. Trigger-based materialized views natively provide this functionality. A materialized view initiates a read on the table engine, receiving batches of documents. The TO clause determines the destination of the data - typically a table of the Merge Tree family. This process is visualized below:
Steps
1. Prepare
If you have data populated on a target topic, you can adapt the following for use in your dataset. Alternatively, a sample Github dataset is provided here. This dataset is used in the examples below and uses a reduced schema and subset of the rows (specifically, we limit to Github events concerning the ClickHouse repository), compared to the full dataset available here, for brevity. This is still sufficient for most of the queries published with the dataset to work.
2. Configure ClickHouse
This step is required if you are connecting to a secure Kafka. These settings cannot be passed through the SQL DDL commands and must be configured in the ClickHouse config.xml. We assume you are connecting to a SASL secured instance. This is the simplest method when interacting with Confluent Cloud.
<clickhouse>
   <kafka>
       <sasl_username>username</sasl_username>
       <sasl_password>password</sasl_password>
       <security_protocol>sasl_ssl</security_protocol>
       <sasl_mechanisms>PLAIN</sasl_mechanisms>
   </kafka>
</clickhouse>
Either place the above snippet inside a new file under your conf.d/ directory or merge it into existing configuration files. For settings that can be configured, see here.
3. Create the destination table
Prepare your destination table. In the example below we use the reduced GitHub schema for purposes of brevity. Note that although we use a MergeTree table engine, this example could easily be adapted for any member of the MergeTree family.
CREATE TABLE github
(
    file_time DateTime,
    event_type Enum('CommitCommentEvent' = 1, 'CreateEvent' = 2, 'DeleteEvent' = 3, 'ForkEvent' = 4, 'GollumEvent' = 5, 'IssueCommentEvent' = 6, 'IssuesEvent' = 7, 'MemberEvent' = 8, 'PublicEvent' = 9, 'PullRequestEvent' = 10, 'PullRequestReviewCommentEvent' = 11, 'PushEvent' = 12, 'ReleaseEvent' = 13, 'SponsorshipEvent' = 14, 'WatchEvent' = 15, 'GistEvent' = 16, 'FollowEvent' = 17, 'DownloadEvent' = 18, 'PullRequestReviewEvent' = 19, 'ForkApplyEvent' = 20, 'Event' = 21, 'TeamAddEvent' = 22),
    actor_login LowCardinality(String),
    repo_name LowCardinality(String),
    created_at DateTime,
    updated_at DateTime,
    action Enum('none' = 0, 'created' = 1, 'added' = 2, 'edited' = 3, 'deleted' = 4, 'opened' = 5, 'closed' = 6, 'reopened' = 7, 'assigned' = 8, 'unassigned' = 9, 'labeled' = 10, 'unlabeled' = 11, 'review_requested' = 12, 'review_request_removed' = 13, 'synchronize' = 14, 'started' = 15, 'published' = 16, 'update' = 17, 'create' = 18, 'fork' = 19, 'merged' = 20),
    comment_id UInt64,
    path String,
    ref LowCardinality(String),
    ref_type Enum('none' = 0, 'branch' = 1, 'tag' = 2, 'repository' = 3, 'unknown' = 4),
    creator_user_login LowCardinality(String),
    number UInt32,
    title String,
    labels Array(LowCardinality(String)),
    state Enum('none' = 0, 'open' = 1, 'closed' = 2),
    assignee LowCardinality(String),
    assignees Array(LowCardinality(String)),
    closed_at DateTime,
    merged_at DateTime,
    merge_commit_sha String,
    requested_reviewers Array(LowCardinality(String)),
    merged_by LowCardinality(String),
    review_comments UInt32,
    member_login LowCardinality(String)
) ENGINE = MergeTree ORDER BY (event_type, repo_name, created_at)
4. Create and populate the topic
Kcat is recommended as a simple means of publishing data to a topic. Using the provided dataset with Confluent Cloud is as simple as modifying the configuration file and running the below example. The following assumes you have created the topic “github”.
cat github_all_columns.ndjson | kcat -b <host>:<port> -X security.protocol=sasl_ssl -X sasl.mechanisms=PLAIN -X sasl.username=<username> -X sasl.password=<password> -t github
Note that this dataset is deliberately small, with only 200,000 rows. This should take only a few seconds to insert on most Kafka clusters, although this may depend on network connectivity. We include instructions to produce larger datasets should you need e.g. for performance testing.
5. Create the Kafka table engine
The below example creates a table engine with the same schema as the merge tree table. Note that this isn’t required, e.g. you can have an alias or ephemeral columns in the target table. The settings are important; however - note the use of JSONEachRow as the data type for consuming JSON from a Kafka topic. The values “github” and “clickhouse” represent the name of the topic and consumer group names, respectively. Note that the topics can actually be a list of values.
CREATE TABLE default.github_queue
(
    file_time DateTime,
    event_type Enum('CommitCommentEvent' = 1, 'CreateEvent' = 2, 'DeleteEvent' = 3, 'ForkEvent' = 4, 'GollumEvent' = 5, 'IssueCommentEvent' = 6, 'IssuesEvent' = 7, 'MemberEvent' = 8, 'PublicEvent' = 9, 'PullRequestEvent' = 10, 'PullRequestReviewCommentEvent' = 11, 'PushEvent' = 12, 'ReleaseEvent' = 13, 'SponsorshipEvent' = 14, 'WatchEvent' = 15, 'GistEvent' = 16, 'FollowEvent' = 17, 'DownloadEvent' = 18, 'PullRequestReviewEvent' = 19, 'ForkApplyEvent' = 20, 'Event' = 21, 'TeamAddEvent' = 22),
    actor_login LowCardinality(String),
    repo_name LowCardinality(String),
    created_at DateTime,
    updated_at DateTime,
    action Enum('none' = 0, 'created' = 1, 'added' = 2, 'edited' = 3, 'deleted' = 4, 'opened' = 5, 'closed' = 6, 'reopened' = 7, 'assigned' = 8, 'unassigned' = 9, 'labeled' = 10, 'unlabeled' = 11, 'review_requested' = 12, 'review_request_removed' = 13, 'synchronize' = 14, 'started' = 15, 'published' = 16, 'update' = 17, 'create' = 18, 'fork' = 19, 'merged' = 20),
    comment_id UInt64,
    path String,
    ref LowCardinality(String),
    ref_type Enum('none' = 0, 'branch' = 1, 'tag' = 2, 'repository' = 3, 'unknown' = 4),
    creator_user_login LowCardinality(String),
    number UInt32,
    title String,
    labels Array(LowCardinality(String)),
    state Enum('none' = 0, 'open' = 1, 'closed' = 2),
    assignee LowCardinality(String),
    assignees Array(LowCardinality(String)),
    closed_at DateTime,
    merged_at DateTime,
    merge_commit_sha String,
    requested_reviewers Array(LowCardinality(String)),
    merged_by LowCardinality(String),
    review_comments UInt32,
    member_login LowCardinality(String)
)
   ENGINE = Kafka('kafka_host:9092', 'github', 'clickhouse',
            'JSONEachRow') settings kafka_thread_per_consumer = 0, kafka_num_consumers = 1;
We discuss engine settings and performance tuning below. At this point, a simple select on the table github_queue should read some rows. Note that this will move the consumer offsets forward, preventing these rows from being re-read without a reset. Note the limit and required parameter stream_like_engine_allow_direct_select.
6. Create the materialized view
The materialized view will connect the two previously created tables, reading data from the Kafka table engine and inserting it into the target merge tree table. We can do a number of data transformations. We will do a simple read and insert. The use of * assumes column names are identical (case sensitive).
CREATE MATERIALIZED VIEW default.github_mv TO default.github AS
SELECT *
FROM default.github_queue;
At the point of creation, the materialized view connects to the Kafka engine and commences reading: inserting rows into the target table. This process will continue indefinitely, with subsequent message inserts into Kafka being consumed. Feel free to re-run the insertion script to insert further messages to Kafka.
7. Confirm rows have been inserted
Confirm data exists in the target table:
SELECT count() FROM default.github;
You should see 200,000 rows:
┌─count()─┐
│  200000 │
└─────────┘
Common Operations
Stopping & restarting message consumption
To stop message consumption, simply detach the Kafka engine table e.g.
DETACH TABLE github_queue;
Note that this will not impact the offsets of the consumer group. To restart consumption, and continue from the previous offset, simply reattach the table.
ATTACH TABLE github_queue;
We can use this operation to make setting and schema changes - see below.
Adding Kafka Metadata
It is not uncommon for users to need to identify the coordinates of the original Kafka messages for the rows in ClickHouse. For example, we may want to know how much of a specific topic or partition we have consumed. For this purpose, the Kafka table engine exposes several virtual columns. These can be persisted as columns in our target table by modifying our schema and materialized view’s select statement.
First, we perform the stop operation described above before adding columns to our target table.
DETACH TABLE github_queue;
Below we add information columns to identify the source topic and the partition from which the row originated.
ALTER TABLE github
   ADD COLUMN topic String,
   ADD COLUMN partition UInt64;
Next, we need to ensure virtual columns are mapped as required. This requires us to drop and recreate our materialized view. Note those prefixed with _. A complete listing of virtual columns can be found here.
DROP VIEW default.github_mv;

CREATE MATERIALIZED VIEW default.github_mv TO default.github AS
SELECT *, _topic as topic, _partition as partition
FROM default.github_queue;
Finally, we are good to reattach our Kafka engine table github_queue and restart message consumption.
ATTACH TABLE github_queue;
Newly consumed rows should have the metadata.
SELECT actor_login, event_type, created_at, topic, partition FROM default.github LIMIT 10;
The result looks like:
| actor_login | event_type | created_at | topic | partition |
|---|---|---|---|---|
| IgorMinar | CommitCommentEvent | 2011-02-12 02:22:00 | github | 0 |
| queeup | CommitCommentEvent | 2011-02-12 02:23:23 | github | 0 |
| IgorMinar | CommitCommentEvent | 2011-02-12 02:23:24 | github | 0 |
| IgorMinar | CommitCommentEvent | 2011-02-12 02:24:50 | github | 0 |
| IgorMinar | CommitCommentEvent | 2011-02-12 02:25:20 | github | 0 |
| dapi | CommitCommentEvent | 2011-02-12 06:18:36 | github | 0 |
| sourcerebels | CommitCommentEvent | 2011-02-12 06:34:10 | github | 0 |
| jamierumbelow | CommitCommentEvent | 2011-02-12 12:21:40 | github | 0 |
| jpn | CommitCommentEvent | 2011-02-12 12:24:31 | github | 0 |
| Oxonium | CommitCommentEvent | 2011-02-12 12:31:28 | github | 0 |
Modify Kafka Engine Settings
We recommend dropping the Kafka engine table and recreating it with the new settings. The materialized view does not need to be modified during this process - message consumption will resume once the Kafka engine table is recreated.
Debugging Issues
Errors such as authentication issues are not reported in responses to Kafka engine DDL. For diagnosing issues, we recommend using the main ClickHouse log file clickhouse-server.err.log. Further trace logging for the underlying Kafka client library librdkafka can be enabled through configuration.
<kafka>
   <debug>all</debug>
</kafka>
Handling malformed messages
Kafka is often used as a "dumping ground" for data. This leads to topics containing mixed message formats and inconsistent field names. Avoid this and utilize Kafka features such Kafka Streams or ksqlDB to ensure messages are well-formed and consistent before insertion into Kafka. If these options are not possible, we can assist:
- Treat the message field as strings. Functions can be used in the materialized view statement to perform cleansing and casting if required. This should not represent a production solution but might assist in one-off ingestions.
- If you’re consuming JSON from a topic, using the JSONEachRow format, consider the setting input_format_skip_unknown_fields. Normally, when writing data, ClickHouse throws an exception if input data contains columns that do not exist in the target table. If this option is enabled, these excess columns will be ignored. Again this is not a production-level solution and might confuse others.
- Consider the setting kafka_skip_broken_messages. This requires the user to specify the level of tolerance per block for malformed messages - considered in the context of kafka_max_block_size. If this tolerance is exceeded (measured in absolute messages) the usual exception behaviour will revert, and other messages will be skipped.
Delivery Semantics and challenges with duplicates
The Kafka table engine has at-least-once semantics. Duplicates are possible in several known rare circumstances. For example, messages could be read from Kafka and successfully inserted into ClickHouse. Before the new offset can be committed, the connection to Kafka is lost. A retry of the block in this situation is required. The block may be de-duplicated using a distributed table or ReplicatedMergeTree as the target table. While this reduces the chance of duplicate rows, it relies on identical blocks. Events such as a Kafka rebalancing may invalidate this assumption, causing duplicates in rare circumstances.
Quorum based Inserts
Users often need quorum-based inserts for cases where higher delivery guarantees are required in ClickHouse. This can’t be set on the materialized view or the target table. It can, however, be set for user profiles e.g.
<profiles>
  <default>
    <insert_quorum>2</insert_quorum>
  </default>
</profiles>
ClickHouse to Kafka
Although a rarer use case, ClickHouse data can also be persisted in Kafka. For example, we will insert rows manually into a Kafka table engine. This data will be read by the same Kafka engine, whose materialized view will place the data into a Merge Tree table. Finally, we demonstrate the application of materialized views in inserts to Kafka to read tables from existing source tables.
Steps
Our initial objective is best illustrated:
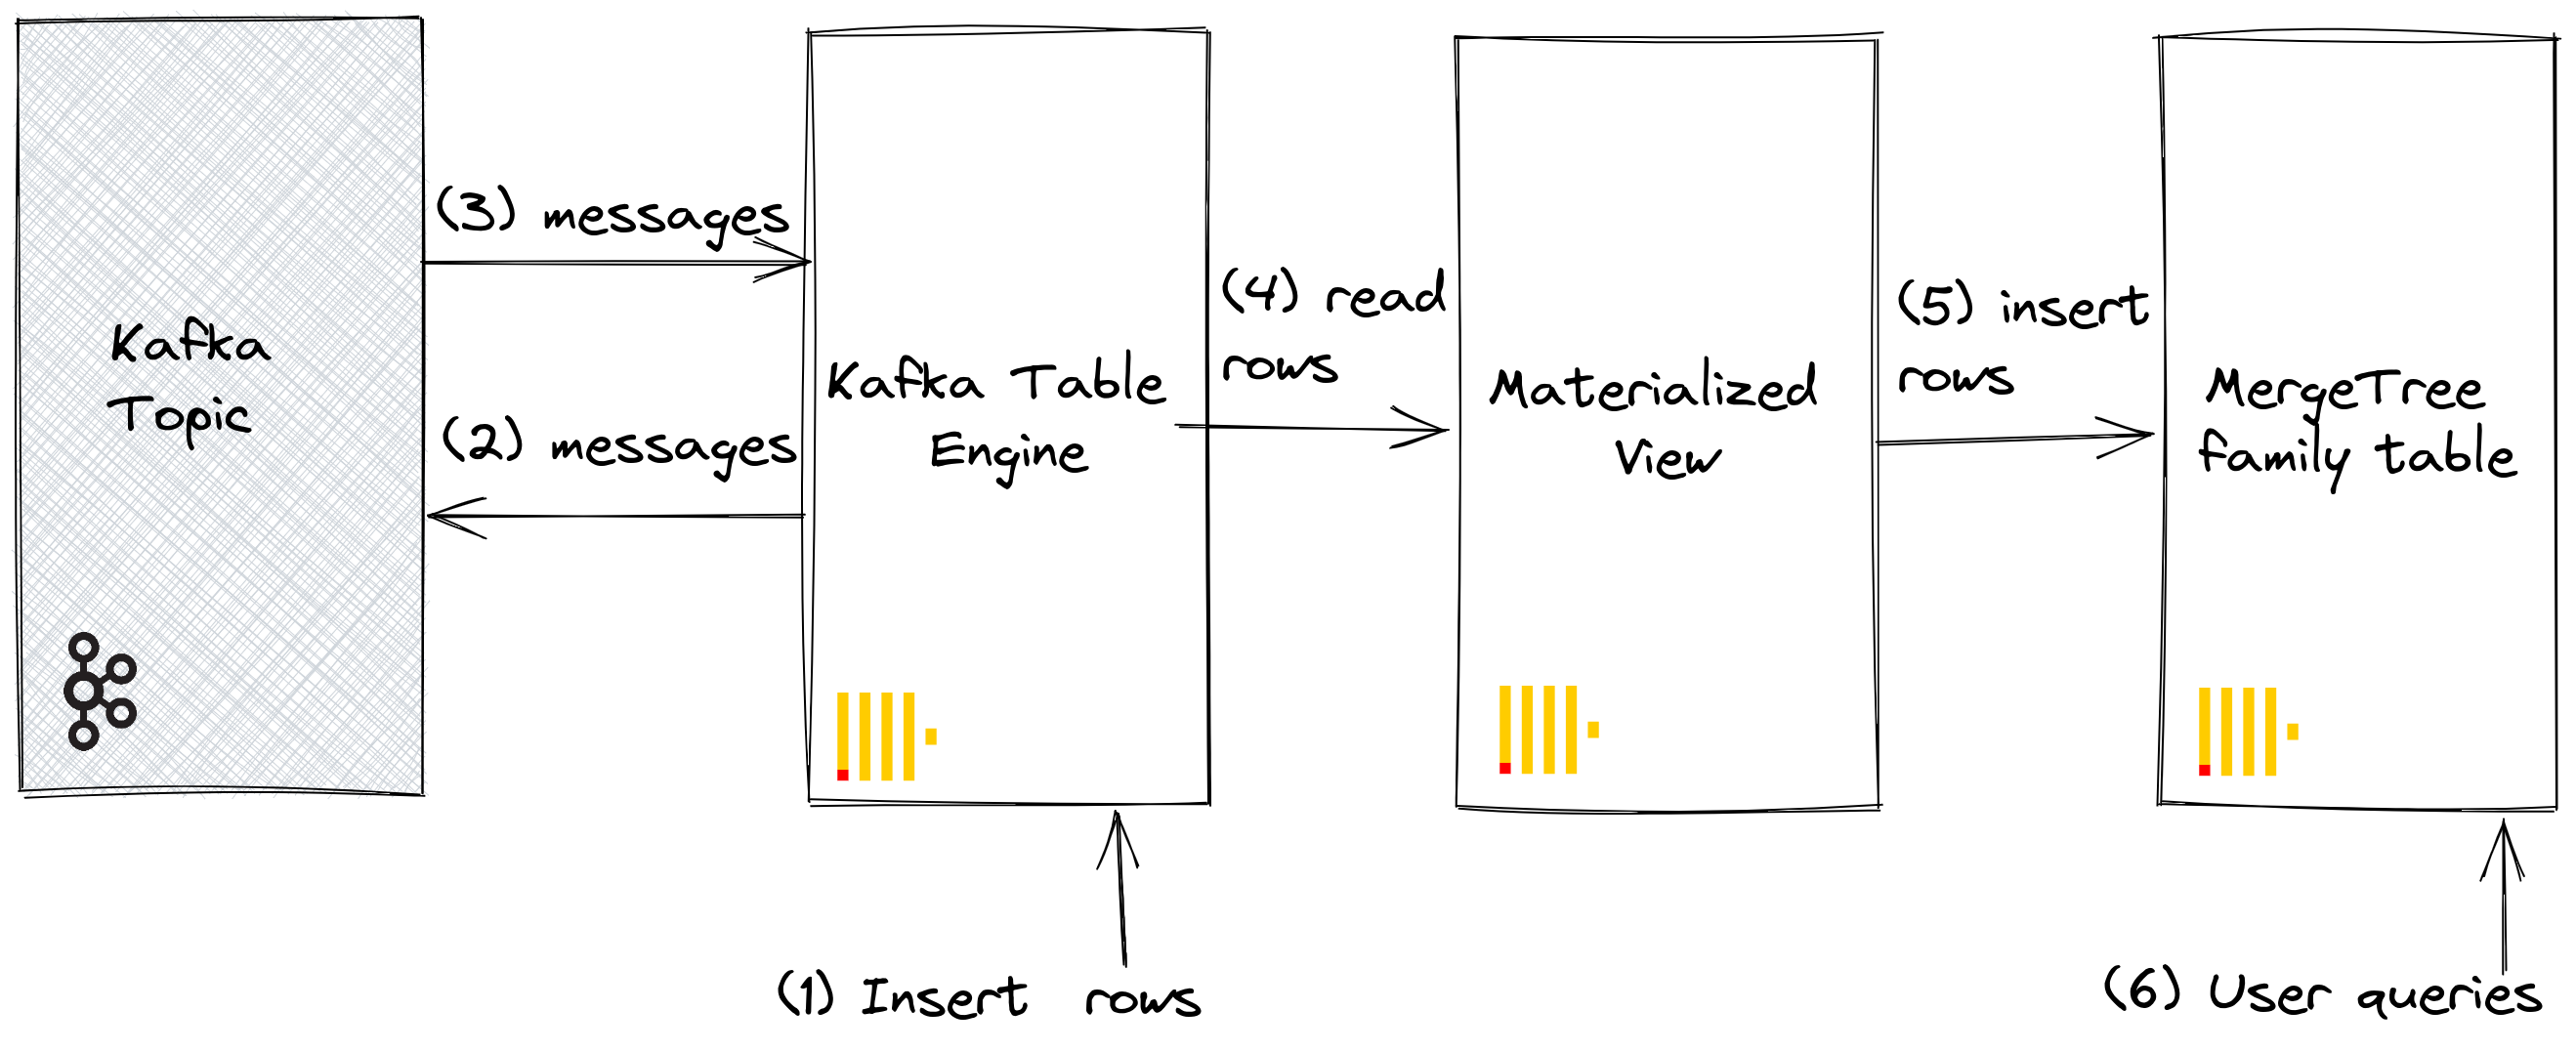
We assume you have the tables and views created under steps for Kafka to ClickHouse and that the topic has been fully consumed.
1. Inserting rows directly
First, confirm the count of the target table.
SELECT count() FROM default.github;
You should have 200,000 rows:
┌─count()─┐
│  200000 │
└─────────┘
Now insert rows from the GitHub target table back into the Kafka table engine github_queue. Note how we utilize JSONEachRow format and LIMIT the select to 100.
INSERT INTO default.github_queue SELECT * FROM default.github LIMIT 100 FORMAT JSONEachRow
Recount the row in GitHub to confirm it has increased by 100. As shown in the above diagram, rows have been inserted into Kafka via the Kafka table engine before being re-read by the same engine and inserted into the GitHub target table by our materialized view!
SELECT count() FROM default.github;
You should see 100 additional rows:
┌─count()─┐
│  200100 │
└─────────┘
2. Utilizing materialized views
We can utilize materialized views to push messages to a Kafka engine (and a topic) when documents are inserted into a table. When rows are inserted into the GitHub table, a materialized view is triggered, which causes the rows to be inserted back into a Kafka engine and into a new topic. Again this is best illustrated:
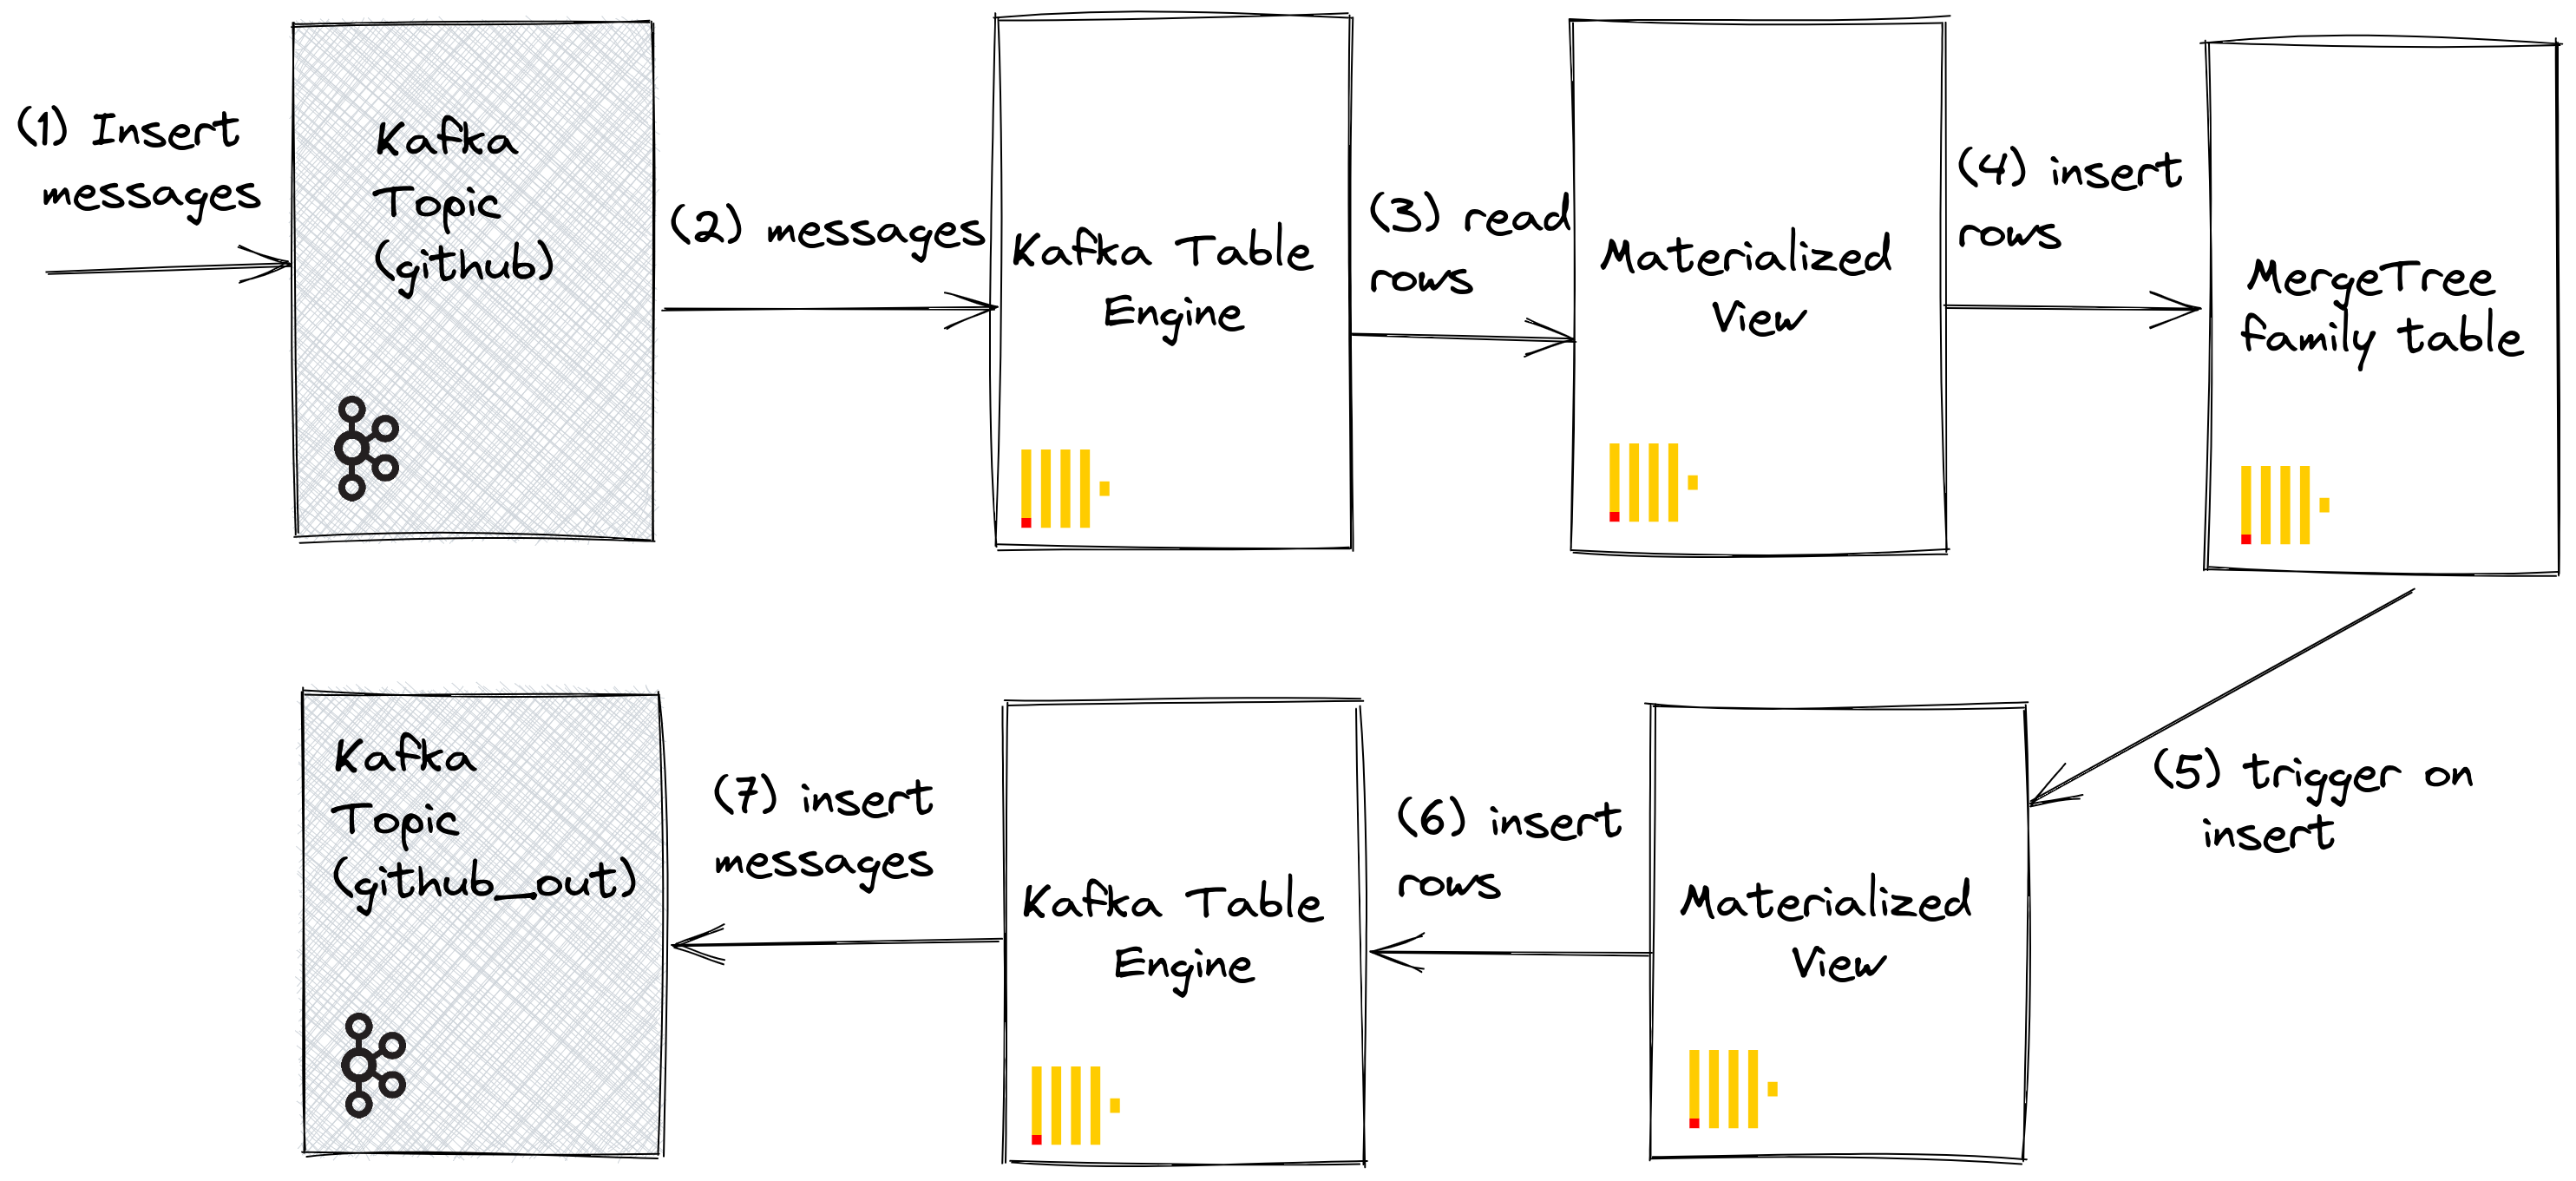
Create a new Kafka topic github_out or equivalent. Ensure a Kafka table engine github_out_queue points to this topic.
CREATE TABLE default.github_out_queue
(
    file_time DateTime,
    event_type Enum('CommitCommentEvent' = 1, 'CreateEvent' = 2, 'DeleteEvent' = 3, 'ForkEvent' = 4, 'GollumEvent' = 5, 'IssueCommentEvent' = 6, 'IssuesEvent' = 7, 'MemberEvent' = 8, 'PublicEvent' = 9, 'PullRequestEvent' = 10, 'PullRequestReviewCommentEvent' = 11, 'PushEvent' = 12, 'ReleaseEvent' = 13, 'SponsorshipEvent' = 14, 'WatchEvent' = 15, 'GistEvent' = 16, 'FollowEvent' = 17, 'DownloadEvent' = 18, 'PullRequestReviewEvent' = 19, 'ForkApplyEvent' = 20, 'Event' = 21, 'TeamAddEvent' = 22),
    actor_login LowCardinality(String),
    repo_name LowCardinality(String),
    created_at DateTime,
    updated_at DateTime,
    action Enum('none' = 0, 'created' = 1, 'added' = 2, 'edited' = 3, 'deleted' = 4, 'opened' = 5, 'closed' = 6, 'reopened' = 7, 'assigned' = 8, 'unassigned' = 9, 'labeled' = 10, 'unlabeled' = 11, 'review_requested' = 12, 'review_request_removed' = 13, 'synchronize' = 14, 'started' = 15, 'published' = 16, 'update' = 17, 'create' = 18, 'fork' = 19, 'merged' = 20),
    comment_id UInt64,
    path String,
    ref LowCardinality(String),
    ref_type Enum('none' = 0, 'branch' = 1, 'tag' = 2, 'repository' = 3, 'unknown' = 4),
    creator_user_login LowCardinality(String),
    number UInt32,
    title String,
    labels Array(LowCardinality(String)),
    state Enum('none' = 0, 'open' = 1, 'closed' = 2),
    assignee LowCardinality(String),
    assignees Array(LowCardinality(String)),
    closed_at DateTime,
    merged_at DateTime,
    merge_commit_sha String,
    requested_reviewers Array(LowCardinality(String)),
    merged_by LowCardinality(String),
    review_comments UInt32,
    member_login LowCardinality(String)
)
   ENGINE = Kafka('host:port', 'github_out', 'clickhouse_out',
            'JSONEachRow') settings kafka_thread_per_consumer = 0, kafka_num_consumers = 1;
Now create a new materialized view github_out_mv to point at the GitHub table, inserting rows to the above engine when it triggers. Additions to the GitHub table will, as a result, be pushed to our new Kafka topic.
CREATE MATERIALIZED VIEW default.github_out_mv TO default.github_out_queue AS
SELECT file_time, event_type, actor_login, repo_name, created_at, updated_at, action, comment_id, path, ref, ref_type, creator_user_login, number, title, labels, state, assignee, assignees, closed_at, merged_at, merge_commit_sha, requested_reviewers, merged_by, review_comments, member_login FROM default.github FORMAT JsonEachRow;
Should you insert into the original github topic, created as part of Kafka to ClickHouse, documents will magically appear in the “github_clickhouse” topic. Confirm this with native Kafka tooling. For example, below, we insert 100 rows onto the github topic using kcat for a Confluent Cloud hosted topic:
head -n 10 github_all_columns.ndjson | kcat -b <host>:<port> -X security.protocol=sasl_ssl -X sasl.mechanisms=PLAIN -X sasl.username=<username> -X sasl.password=<password> -t github
A read on the github_out topic should confirm delivery of the messages.
kcat -b <host>:<port> -X security.protocol=sasl_ssl -X sasl.mechanisms=PLAIN -X sasl.username=<username> -X sasl.password=<password> -t github_out -C -e -q | wc -l
Although an elaborate example, this illustrates the power of materialized views when used in conjunction with the Kafka engine.
Clusters and Performance
Working with ClickHouse Clusters
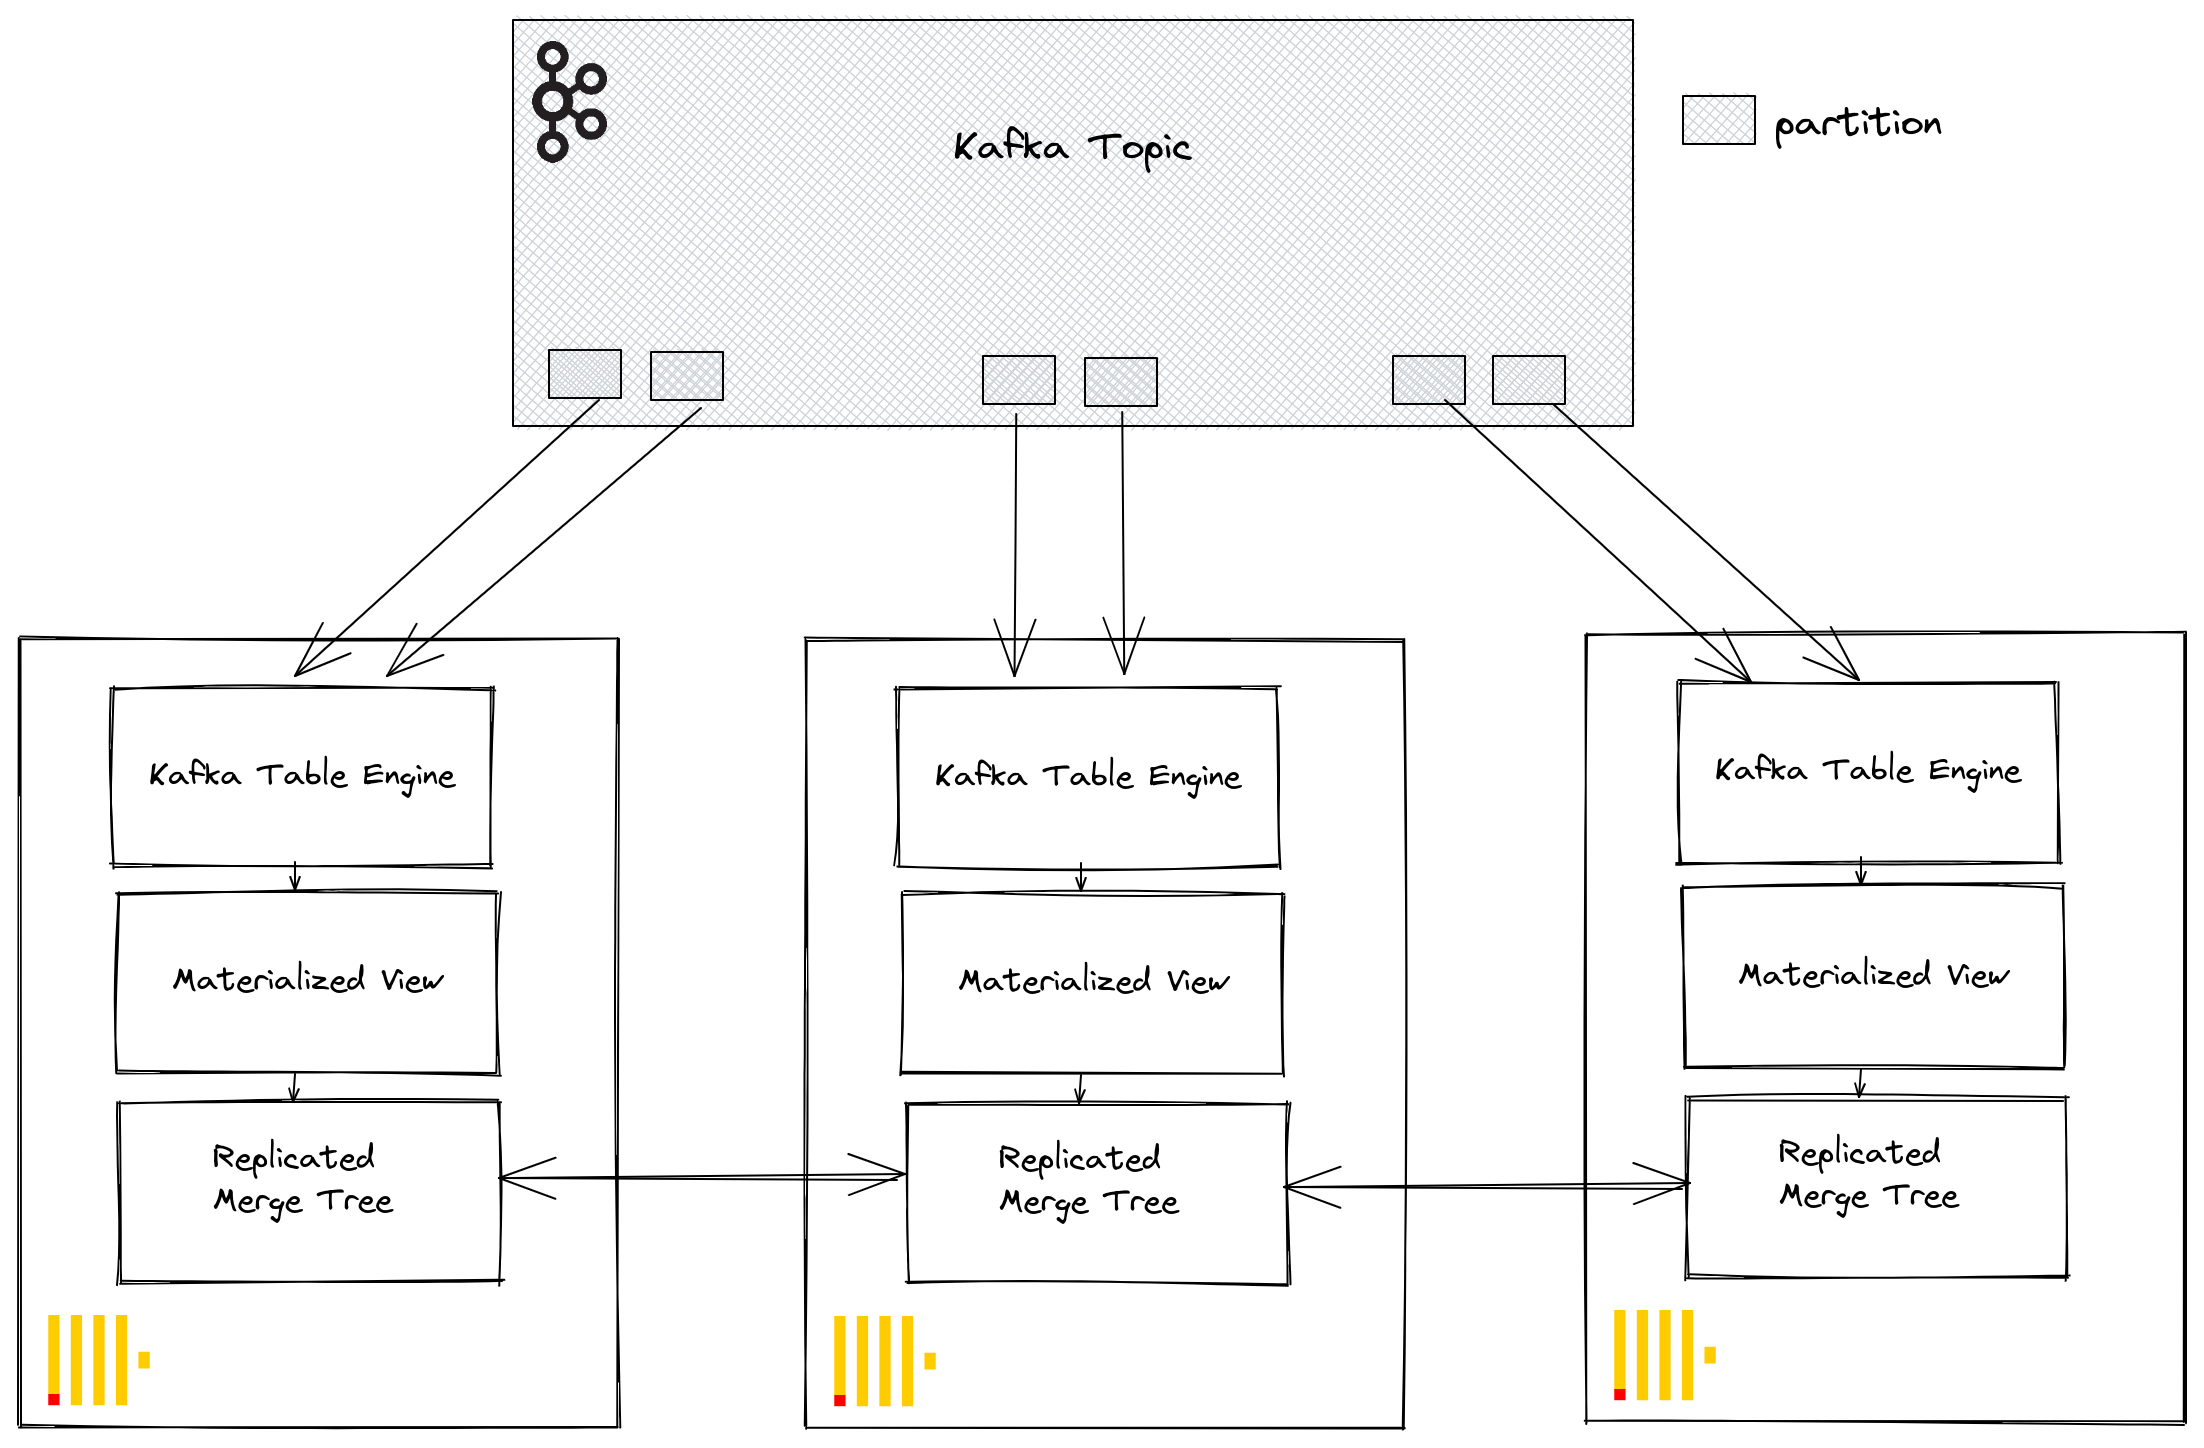
Through Kafka consumer groups, multiple ClickHouse instances can potentially read from the same topic. Each consumer will be assigned to a topic partition in a 1:1 mapping. When scaling ClickHouse consumption using the Kafka table engine, consider that the total number of consumers within a cluster cannot exceed the number of partitions on the topic. Therefore ensure partitioning is appropriately configured for the topic in advance.
Multiple ClickHouse instances can all be configured to read from a topic using the same consumer group id - specified during the Kafka table engine creation. Therefore, each instance will read from one or more partitions, inserting segments to their local target table. The target tables can, in turn, be configured to use a ReplicatedMergeTree to handle duplication of the data. This approach allows Kafka reads to be scaled with the ClickHouse cluster, provided there are sufficient Kafka partitions.
Tuning Performance
Consider the following when looking to increase Kafka Engine table throughput performance:
- The performance will vary depending on the message size, format, and target table types. 100k rows/sec on a single table engine should be considered obtainable. By default, messages are read in blocks, controlled by the parameter kafka_max_block_size. By default, this is set to the max_block_size, defaulting to 65,536. Unless messages are extremely large, this should nearly always be increased. Values between 500k to 1M are not uncommon. Test and evaluate the effect on throughput performance.
- The number of consumers for a table engine can be increased using kafka_num_consumers. However, by default, inserts will be linearized in a single thread unless kafka_thread_per_consumer is changed from the default value of 1. Set this to 1 to ensure flushes are performed in parallel. Note that creating a Kafka engine table with N consumers (and kafka_thread_per_consumer=1) is logically equivalent to creating N Kafka engines, each with a materialized view and kafka_thread_per_consumer=0.
- Increasing consumers is not a free operation. Each consumer maintains its own buffers and threads, increasing the overhead on the server. Be conscious of the overhead of consumers and scale linearly across your cluster first and if possible.
- If the throughput of Kafka messages is variable and delays are acceptable, consider increasing the stream_flush_interval_ms to ensure larger blocks are flushed.
- background_schedule_pool_size sets the number of threads performing background tasks. These threads are used for Kafka streaming. This setting is applied at the ClickHouse server start and can’t be changed in a user session, defaulting to 128. It is unlikely you should ever need to change this as sufficient threads are available for the number of Kafka engines you will create on a single host. If you see timeouts in the logs, it may be appropriate to increase this.
- For communication with Kafka, the librdkafka library is used, which itself creates threads. Large numbers of Kafka tables, or consumers, can thus result in large numbers of context switches. Either distribute this load across the cluster, only replicating the target tables if possible, or consider using a table engine to read from multiple topics - a list of values is supported. Multiple materialized views can be read from a single table, each filtering to the data from a specific topic.
Any settings changes should be tested. We recommend monitoring Kafka consumer lags to ensure you are properly scaled.
Additional Settings
Aside from the settings discussed above, the following may be of interest:
- Kafka_max_wait_ms - The wait time in milliseconds for reading messages from Kafka before retry. Set at a user profile level and defaults to 5000.
All settings from the underlying librdkafka can also be placed in the ClickHouse configuration files inside a kafka element - setting names should be XML elements with periods replaced with underscores e.g.
<clickhouse>
   <kafka>
       <enable_ssl_certificate_verification>false</enable_ssl_certificate_verification>
   </kafka>
</clickhouse>
These are expert settings for which the user is referred to the Kafka documentation.
Confluent HTTP Sink Connector
The HTTP Sink Connector is data type agnostic and thus does not need a Kafka schema as well as supporting ClickHouse specific data types such as Maps and Arrays. This additional flexibility comes at a slight increase in configuration complexity.
Below we describe a simple installation, pulling messages from a single Kafka topic and inserting rows into a ClickHouse table.
The HTTP Connector is distributed under the Confluent Enterprise License.
Quick start steps
1. Gather your connection details
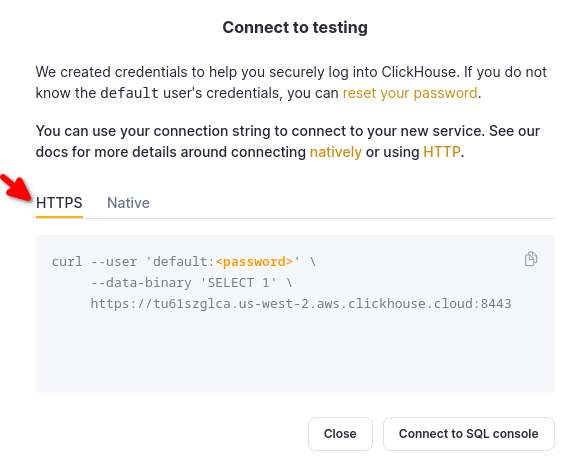
To connect to ClickHouse with HTTP(S) you need this information:
The HOST and PORT: typically, the port is 8443 when using TLS or 8123 when not using TLS.
The DATABASE NAME: out of the box, there is a database named
default, use the name of the database that you want to connect to.The USERNAME and PASSWORD: out of the box, the username is
default. Use the username appropriate for your use case.
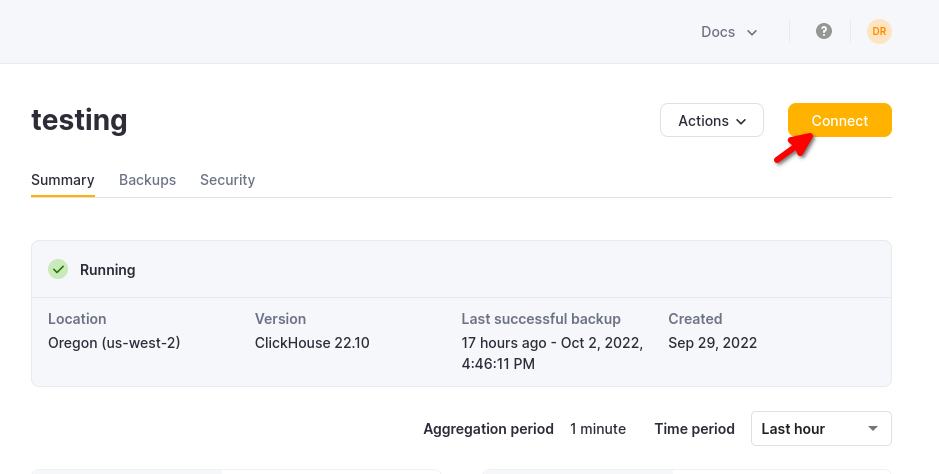
The details for your ClickHouse Cloud service are available in the ClickHouse Cloud console. Select the service that you will connect to and click Connect:
Choose HTTPS, and the details are available in an example curl command.
If you are using self-managed ClickHouse, the connection details are set by your ClickHouse administrator.
2. Run Kafka Connect and the HTTP Sink Connector
You have two options:
Self-managed: Download the Confluent package and install it locally. Follow the installation instructions for installing the connector as documented here. If you use the confluent-hub installation method, your local configuration files will be updated.
Confluent Cloud: A fully managed version of HTTP Sink is available for those using Confluent Cloud for their Kafka hosting. This requires your ClickHouse environment to be accessible from Confluent Cloud.
The following examples are using Confluent Cloud.
3. Create destination table in ClickHouse
Before the connectivity test, let's start by creating a test table in ClickHouse Cloud, this table will receive the data from Kafka:
CREATE TABLE default.my_table
(
    `side` String,
    `quantity` Int32,
    `symbol` String,
    `price` Int32,
    `account` String,
    `userid` String
)
ORDER BY tuple()
4. Configure HTTP Sink
Create a Kafka topic and an instance of HTTP Sink Connector:
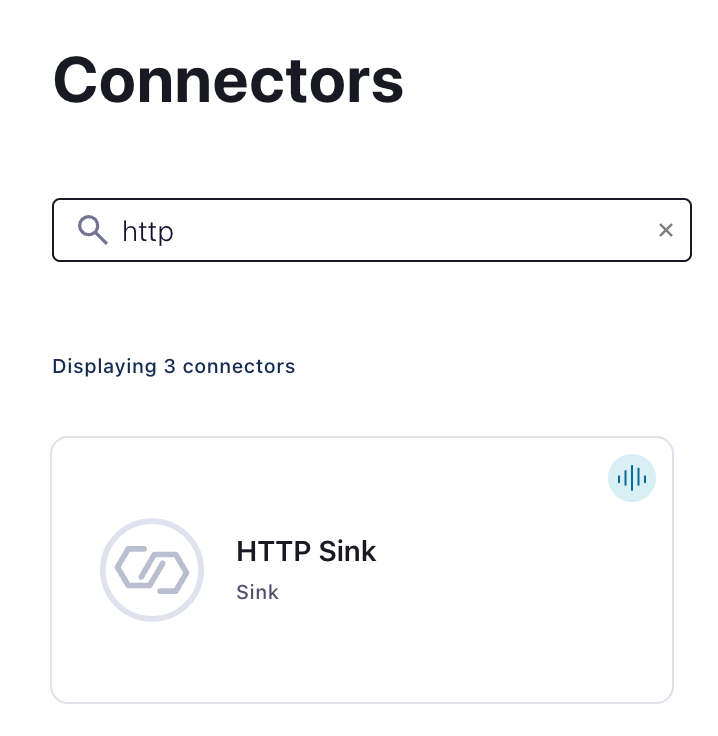
Configure HTTP Sink Connector:
- Provide the topic name you created
- Authentication
HTTP Url- ClickHouse Cloud URL with aINSERTquery specified<protocol>://<clickhouse_host>:<clickhouse_port>?query=INSERT%20INTO%20<database>.<table>%20FORMAT%20JSONEachRow. Note: the query must be encoded.Endpoint Authentication type- BASICAuth username- ClickHouse usernameAuth password- ClickHouse password
This HTTP Url is error-prone. Ensure escaping is precise to avoid issues.
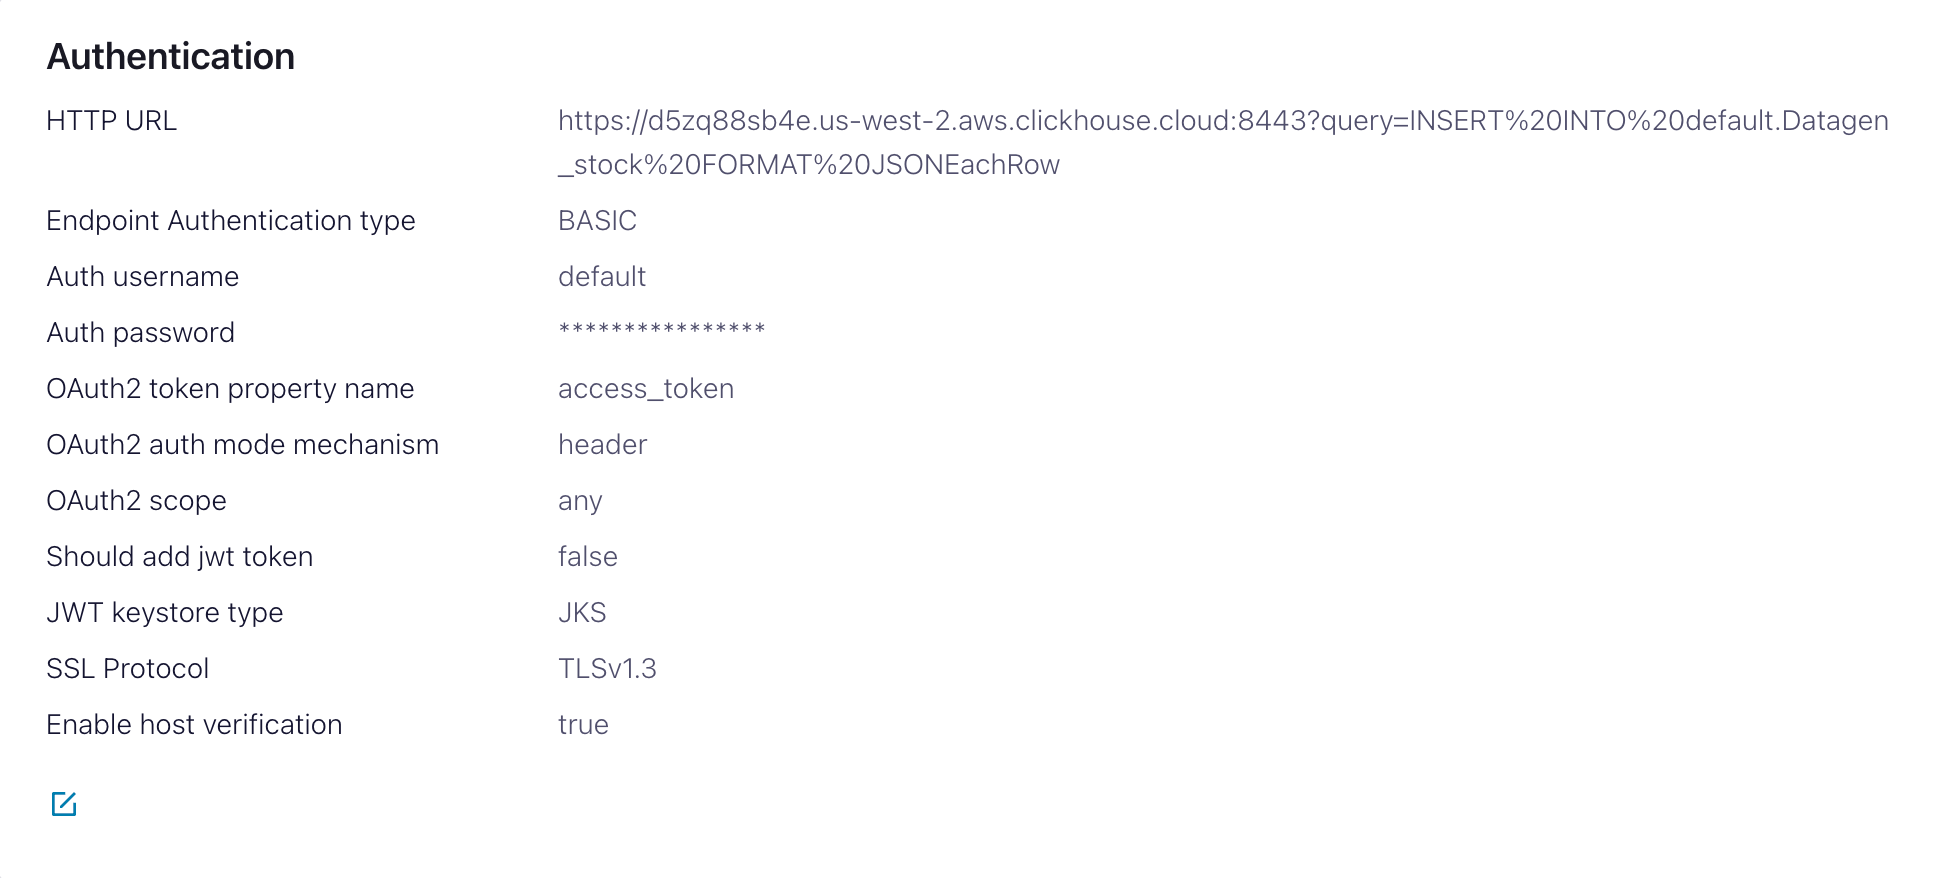
- Configuration
Input Kafka record value formatDepends on your source data but in most cases JSON or Avro. We assumeJSONin the following settings.- In
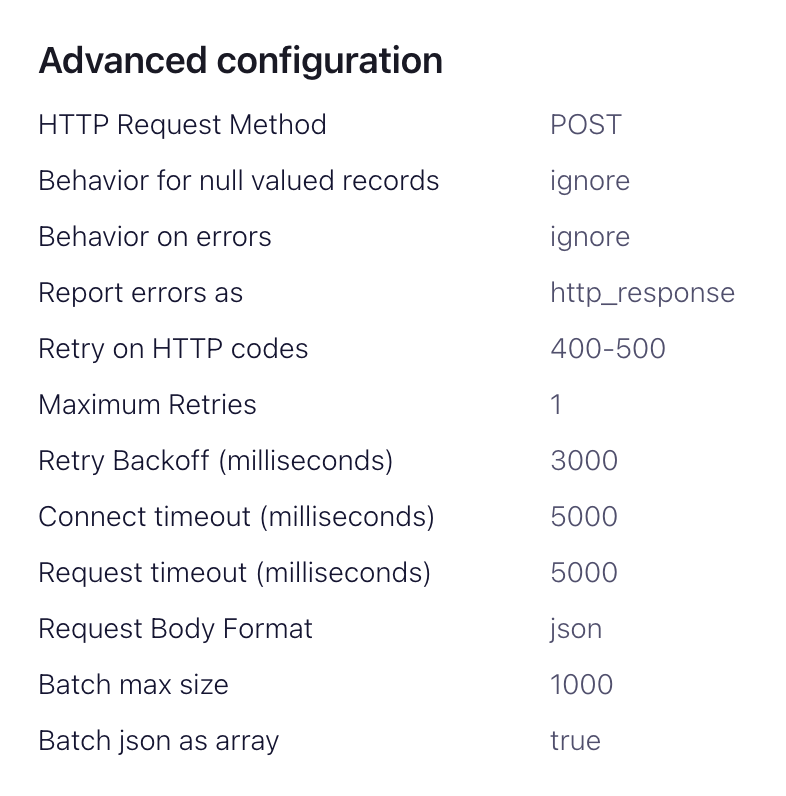
advanced configurationssection:HTTP Request Method- Set to POSTRequest Body Format- jsonBatch batch size- Per ClickHouse recommendations, set this to at least 1000.Batch json as array- trueRetry on HTTP codes- 400-500 but adapt as required e.g. this may change if you have an HTTP proxy in front of ClickHouse.Maximum Reties- the default (10) is appropriate but feel to adjust for more robust retries.
5. Testing the connectivity
Create an message in a topic configured by your HTTP Sink
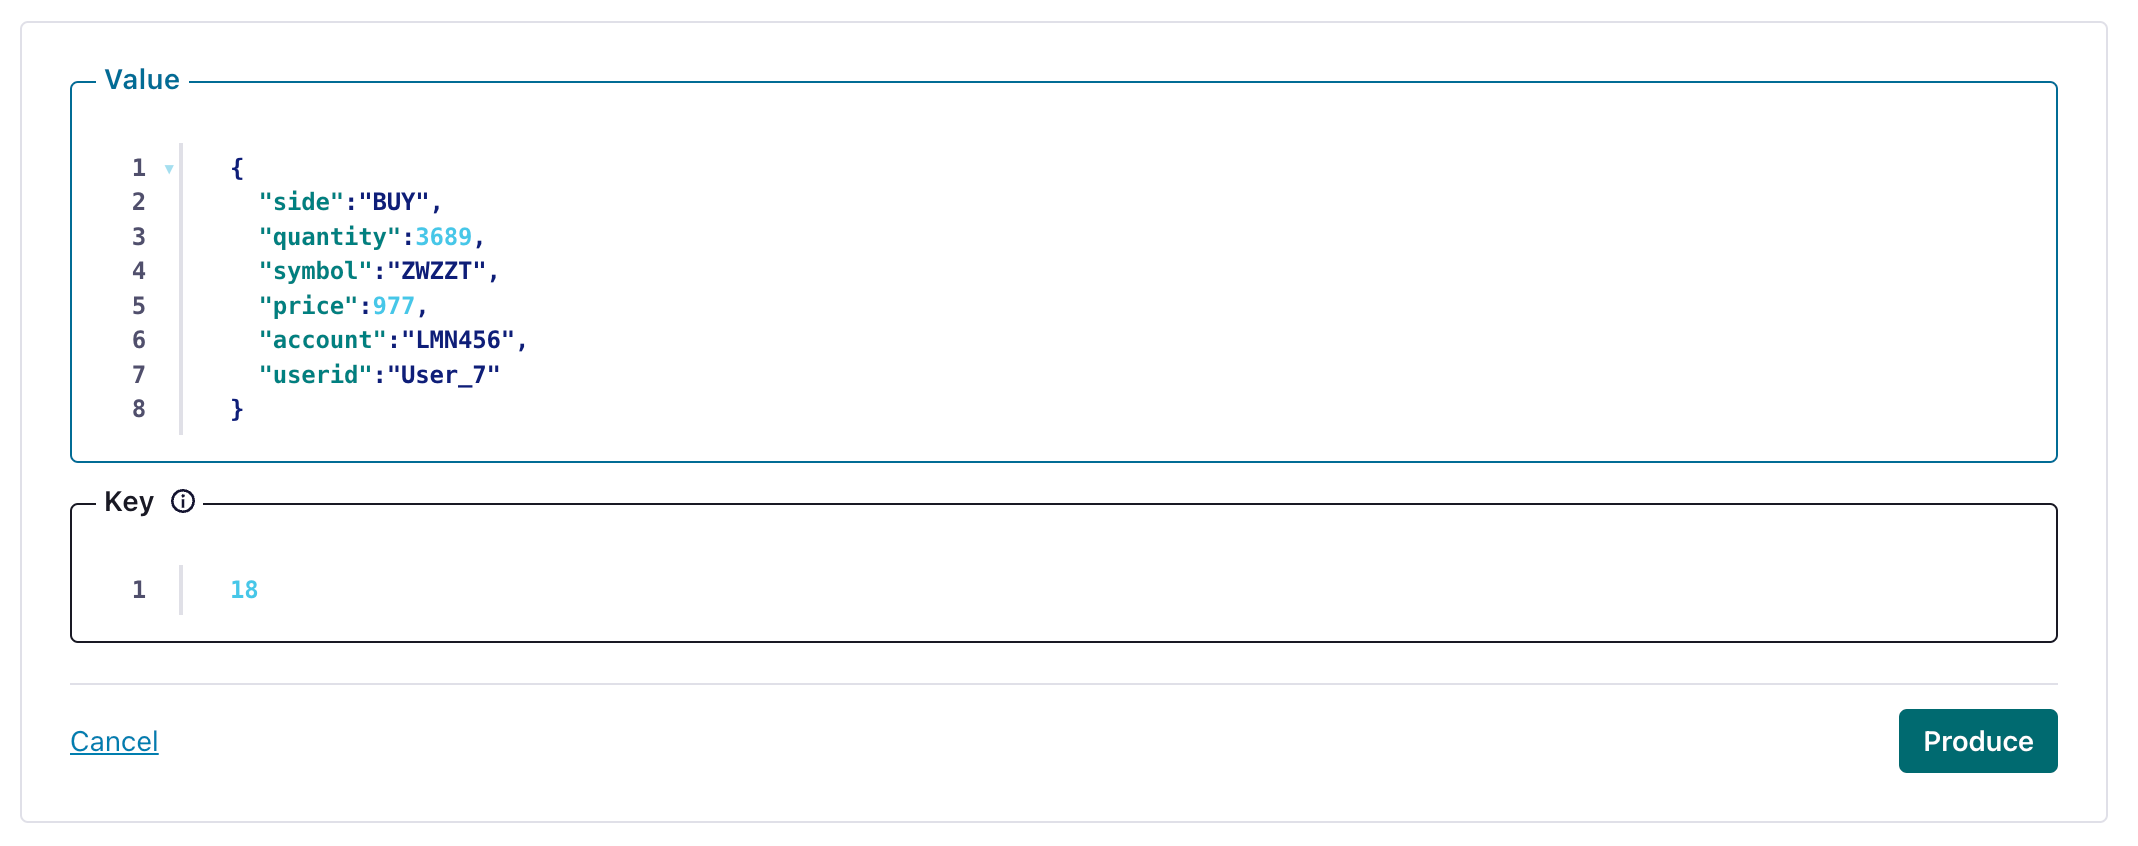
and verify the created message's been written to your ClickHouse instance.
Troubleshooting
HTTP Sink doesn't batch messages
From the Sink documentation:
The HTTP Sink connector does not batch requests for messages containing Kafka header values that are different.
- Verify your Kafka records have the same key.
- When you add parameters to the HTTP API URL, each record can result in a unique URL. For this reason, batching is disabled when using additional URL parameters.
400 Bad Request
CANNOT_PARSE_QUOTED_STRING
If HTTP Sink fails with the following message when inserting a JSON object into a String column:
Code: 26. DB::ParsingException: Cannot parse JSON string: expected opening quote: (while reading the value of key key_name): While executing JSONEachRowRowInputFormat: (at row 1). (CANNOT_PARSE_QUOTED_STRING)
Set input_format_json_read_objects_as_strings=1 setting in URL as encoded string SETTINGS%20input_format_json_read_objects_as_strings%3D1
Load the GitHub dataset (optional)
Note that this example preserves the Array fields of the Github dataset. We assume you have an empty github topic in the examples and use kcat for message insertion to Kafka.
1. Prepare Configuration
Follow these instructions for setting up Connect relevant to your installation type, noting the differences between a standalone and distributed cluster. If using Confluent Cloud, the distributed setup is relevant.
The most important parameter is the http.api.url. The HTTP interface for ClickHouse requires you to encode the INSERT statement as a parameter in the URL. This must include the format (JSONEachRow in this case) and target database. The format must be consistent with the Kafka data, which will be converted to a string in the HTTP payload. These parameters must be URL escaped. An example of this format for the Github dataset (assuming you are running ClickHouse locally) is shown below:
<protocol>://<clickhouse_host>:<clickhouse_port>?query=INSERT%20INTO%20<database>.<table>%20FORMAT%20JSONEachRow

http://localhost:8123?query=INSERT%20INTO%20default.github%20FORMAT%20JSONEachRow
The following additional parameters are relevant to using the HTTP Sink with ClickHouse. A complete parameter list can be found here:
request.method- Set to POSTretry.on.status.codes- Set to 400-500 to retry on any error codes. Refine based expected errors in data.request.body.format- In most cases this will be JSON.auth.type- Set to BASIC if you security with ClickHouse. Other ClickHouse compatible authentication mechanisms are not currently supported.ssl.enabled- set to true if using SSL.connection.user- username for ClickHouse.connection.password- password for ClickHouse.batch.max.size- The number of rows to send in a single batch. Ensure this set is to an appropriately large number. Per ClickHouse recommendations a value of 1000 is should be considered a minimum.tasks.max- The HTTP Sink connector supports running one or more tasks. This can be used to increase performance. Along with batch size this represents your primary means of improving performance.key.converter- set according to the types of your keys.value.converter- set based on the type of data on your topic. This data does not need a schema. The format here must be consistent with the FORMAT specified in the parameterhttp.api.url. The simplest here is to use JSON and the org.apache.kafka.connect.json.JsonConverter converter. Treating the value as a string, via the converter org.apache.kafka.connect.storage.StringConverter, is also possible - although this will require the user to extract a value in the insert statement using functions. Avro format is also supported in ClickHouse if using the io.confluent.connect.avro.AvroConverter converter.
A full list of settings, including how to configure a proxy, retries, and advanced SSL, can be found here.
Example configuration files for the Github sample data can be found here, assuming Connect is run in standalone mode and Kafka is hosted in Confluent Cloud.
2. Create the ClickHouse table
Ensure the table has been created. An example for a minimal github dataset using a standard MergeTree is shown below.
CREATE TABLE github
(
    file_time DateTime,
    event_type Enum('CommitCommentEvent' = 1, 'CreateEvent' = 2, 'DeleteEvent' = 3, 'ForkEvent' = 4,'GollumEvent' = 5, 'IssueCommentEvent' = 6, 'IssuesEvent' = 7, 'MemberEvent' = 8, 'PublicEvent' = 9, 'PullRequestEvent' = 10, 'PullRequestReviewCommentEvent' = 11, 'PushEvent' = 12, 'ReleaseEvent' = 13, 'SponsorshipEvent' = 14, 'WatchEvent' = 15, 'GistEvent' = 16, 'FollowEvent' = 17, 'DownloadEvent' = 18, 'PullRequestReviewEvent' = 19, 'ForkApplyEvent' = 20, 'Event' = 21, 'TeamAddEvent' = 22),
    actor_login LowCardinality(String),
    repo_name LowCardinality(String),
    created_at DateTime,
    updated_at DateTime,
    action Enum('none' = 0, 'created' = 1, 'added' = 2, 'edited' = 3, 'deleted' = 4, 'opened' = 5, 'closed' = 6, 'reopened' = 7, 'assigned' = 8, 'unassigned' = 9, 'labeled' = 10, 'unlabeled' = 11, 'review_requested' = 12, 'review_request_removed' = 13, 'synchronize' = 14, 'started' = 15, 'published' = 16, 'update' = 17, 'create' = 18, 'fork' = 19, 'merged' = 20),
    comment_id UInt64,
    path String,
    ref LowCardinality(String),
    ref_type Enum('none' = 0, 'branch' = 1, 'tag' = 2, 'repository' = 3, 'unknown' = 4),
    creator_user_login LowCardinality(String),
    number UInt32,
    title String,
    labels Array(LowCardinality(String)),
    state Enum('none' = 0, 'open' = 1, 'closed' = 2),
    assignee LowCardinality(String),
    assignees Array(LowCardinality(String)),
    closed_at DateTime,
    merged_at DateTime,
    merge_commit_sha String,
    requested_reviewers Array(LowCardinality(String)),
    merged_by LowCardinality(String),
    review_comments UInt32,
    member_login LowCardinality(String)
) ENGINE = MergeTree ORDER BY (event_type, repo_name, created_at)
3. Add data to Kafka
Insert messages to Kafka. Below we use kcat to insert 10k messages.
head -n 10000 github_all_columns.ndjson | kcat -b <host>:<port> -X security.protocol=sasl_ssl -X sasl.mechanisms=PLAIN -X sasl.username=<username> -X sasl.password=<password> -t github
A simple read on the target table “Github” should confirm the insertion of data.
SELECT count() FROM default.github;

| count\(\) |
| :--- |
| 10000 |
ClickHouse Kafka Connect Sink
If you need any help, please file an issue in the repository or raise a question in ClickHouse public Slack.
ClickHouse Kafka Connect Sink is the Kafka connector delivering data from a Kafka topic to a ClickHouse table.
License
The Kafka Connector Sink is distributed under the Apache 2.0 License
Requirements for the environment
The Kafka Connect framework v2.7 or later should be installed in the environment.
Version compatibility matrix
| ClickHouse Kafka Connect version | ClickHouse version | Kafka Connect | Confluent platform |
|---|---|---|---|
| 1.0.0 | > 22.5 | > 2.7 | > 6.1 |
Main Features
- Shipped with out-of-the-box exactly-once semantics. It's powered by a new ClickHouse core feature named KeeperMap (used as a state store by the connector) and allows for minimalistic architecture.
- Support for 3rd-party state stores: Currently defaults to In-memory but can use KeeperMap (Redis to be added soon).
- Core integration: Built, maintained, and supported by ClickHouse.
- Tested continuously against ClickHouse Cloud.
- Data inserts with a declared schema and schemaless.
- Support for most major data types of ClickHouse (more to be added soon)
Authentication
The connector (through Kafka Connect) supports the following authentication mechanisms:
Installation instructions
Installing on Confluent Cloud
This is meant to be a quick guide to get you started with the ClickHouse Sink Connector on Confluent Cloud. For more details, please refer to the official Confluent documentation.
Create a Topic
Creating a topic on Confluent Cloud is fairly simple, and there are detailed instructions here.
Important Notes
- The Kafka topic name must be the same as the ClickHouse table name. The way to tweak this is by using a transformer (for example ExtractTopic).
- More partitions does not always mean more performance - see our upcoming guide for more details and performance tips.
Install Connector
You can download the connector from our repository - please feel free to submit comments and issues there as well!
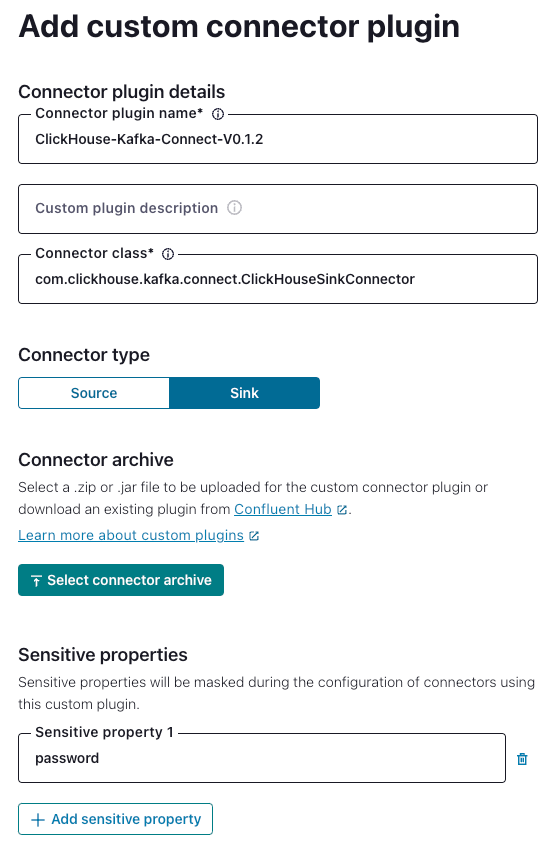
Navigate to “Connector Plugins” -> “Add plugin” and using the following settings:
'Connector Class' - 'com.clickhouse.kafka.connect.ClickHouseSinkConnector'
'Connector type' - Sink
'Sensitive properties' - 'password'. This will ensure entries of the ClickHouse password are masked during configuration.
Example:
Configure the Connector
Navigate to “Connectors” -> “Add Connector” and use the following settings (note that the values are examples only):
{
  "database": "<DATABASE_NAME>",
  "errors.retry.timeout": "30",
  "exactlyOnce": "false",
  "schemas.enable": "false",
  "hostname": "<CLICKHOUSE_HOSTNAME>",
  "password": "<SAMPLE_PASSWORD>",
  "port": "8443",
  "ssl": "true",
  "topics": "<TOPIC_NAME>",
  "username": "<SAMPLE_USERNAME>",
  "key.converter": "org.apache.kafka.connect.storage.StringConverter",
  "value.converter": "org.apache.kafka.connect.json.JsonConverter",
  "value.converter.schemas.enable": "false"
}
Specify the connection endpoints
You need to specify the allow-list of endpoints that the connector can access.
You must use a fully-qualified domain name (FQDN) when adding the networking egress endpoint(s).
Example: u57swl97we.eu-west-1.aws.clickhouse.com:8443
You must specify HTTP(S) port. The Connector doesn't support Native protocol yet.
You should be all set!
Known Limitations
- Custom Connectors must use public internet endpoints. Static IP addresses aren't supported.
- You can override some Custom Connector properties. See the fill list in the official documentation.
- Custom Connectors are available only in some AWS regions
- See the list of Custom Connectors limitations in the official docs
Installing on AWS MSK
General Installation Instructions
The connector is distributed as a single uber JAR file containing all the class files necessary to run the plugin.
To install the plugin, follow these steps:
- Download a zip archive containing the Connector JAR file from the Releases page of ClickHouse Kafka Connect Sink repository.
- Extract the ZIP file content and copy it to the desired location.
- Add a path with the plugin director to plugin.path configuration in your Connect properties file to allow Confluent Platform to find the plugin.
- Provide a topic name, ClickHouse instance hostname, and password in config.
connector.class=com.clickhouse.kafka.connect.ClickHouseSinkConnector
tasks.max=1
topics=<topic_name>
ssl=true
security.protocol=SSL
hostname=<hostname>
database=<database_name>
password=<password>
ssl.truststore.location=/tmp/kafka.client.truststore.jks
port=8443
value.converter.schemas.enable=false
value.converter=org.apache.kafka.connect.json.JsonConverter
exactlyOnce=true
username=default
schemas.enable=false
- Restart the Confluent Platform.
- If you use Confluent Platform, log into Confluent Control Center UI to verify the ClickHouse Sink is available in the list of available connectors.
Configuration options
To connect the ClickHouse Sink to the ClickHouse server, you need to provide:
- connection details: hostname (required) and port (optional)
- user credentials: password (required) and username (optional)
The full table of configuration options:
| Name | Required | Type | Description | Default value |
|---|---|---|---|---|
| hostname | required | string | The hostname or IP address of the server | N/A |
| port | optional | integer | Port the server listens to | 8443 |
| username | optional | string | The name of the user on whose behalf to connect to the server | default |
| password | required | string | Password for the specified user | N/A |
| database | optional | string | The name of the database to write to | default |
| ssl | optional | boolean | Enable TLS for network connections | true |
| exactlyOnce | optional | boolean | Enable exactly-once processing guarantees. When true, stores processing state in KeeperMap. When false, stores processing state in-memory. | false |
| timeoutSeconds | optional | integer | Connection timeout in seconds. | 30 |
| retryCount | optional | integer | Maximum number of retries for a query. No delay between retries. | 3 |
Target Tables
ClickHouse Connect Sink reads messages from Kafka topics and writes them to appropriate tables. ClickHouse Connect Sink writes data into existing tables. Please, make sure a target table with an appropriate schema was created in ClickHouse before starting to insert data into it.
Each topic requires a dedicated target table in ClickHouse. The target table name must match the source topic name.
Pre-processing
If you need to transform outbound messages before they are sent to ClickHouse Kafka Connect Sink, use Kafka Connect Transformations.
Supported Data types
With a schema declared:
| Kafka Connect Type | ClickHouse Type | Supported | Primitive |
|---|---|---|---|
| STRING | String | ✅ | Yes |
| INT8 | Int8 | ✅ | Yes |
| INT16 | Int16 | ✅ | Yes |
| INT32 | Int32 | ✅ | Yes |
| INT64 | Int64 | ✅ | Yes |
| FLOAT32 | Float32 | ✅ | Yes |
| FLOAT64 | Float64 | ✅ | Yes |
| BOOLEAN | Boolean | ✅ | Yes |
| ARRAY | Array(Primitive) | ✅ | No |
| MAP | Map(Primitive, Primitive) | ✅ | No |
| STRUCT | N/A | ❌ | No |
| BYTES | N/A | ❌ | No |
| org.apache.kafka.connect.data.Time | Int64 / DateTime64 | ✅ | No |
| org.apache.kafka.connect.data.Timestamp | Int32 / Date32 | ✅ | No |
Without a schema declared:
A record is converted into JSON and sent to ClickHouse as a value in JSONEachRow format.
Configuration Properties
| Property Name | Default Value | Description |
|---|---|---|
hostname | N/A | The ClickHouse hostname to connect to |
port | 8443 | The ClickHouse port - default is the SSL value |
ssl | true | Enable ssl connection to ClickHouse |
username | default | ClickHouse database username |
password | "" | ClickHouse database password |
database | default | ClickHouse database name |
connector.class | "com.clickhouse.kafka.connect.ClickHouseSinkConnector" | Connector Class(set and keep as the default) |
tasks.max | "1" | The number of Connector Tasks |
errors.retry.timeout | "60" | ClickHouse JDBC Retry Timeout |
exactlyOnce | "false" | Exactly Once Enabled |
topics | "" | The Kafka topics to poll - topic names must match table names |
key.converter | "org.apache.kafka.connect.storage.StringConverter" | Set according to the types of your keys. |
value.converter | "org.apache.kafka.connect.json.JsonConverter" | Set based on the type of data on your topic. This data must have a supported schema - JSON, Avro or Protobuf formats. |
value.converter.schemas.enable | "false" | Connector Value Converter Schema Support |
errors.tolerance | "none" | Connector Error Tolerance |
errors.deadletterqueue.topic.name | "" | If set, a DLQ will be used for failed batches |
errors.deadletterqueue.context.headers.enable | "" | Adds additional headers for the DLQ |
clickhouseSettings | "" | Allows configuration of ClickHouse settings, using a comma seperated list (e.g. "insert_quorum=2, etc...") |
Configuration Recipes
These are some common configuration recipes to get you started quickly.
Basic Configuration
The most basic configuration to get you started - it assumes you're running Kafka Connect in distributed mode and have a ClickHouse server running on localhost:8443 with SSL enabled, data is in schemaless JSON.
{
  "name": "clickhouse-connect",
  "config": {
    "connector.class": "com.clickhouse.kafka.connect.ClickHouseSinkConnector",
    "tasks.max": "1",
    "database": "default",
    "errors.retry.timeout": "60",
    "exactlyOnce": "false",
    "hostname": "localhost",
    "port": "8443",
    "ssl": "true",
    "username": "default",
    "password": "<PASSWORD>",
    "topics": "<TOPIC_NAME>",
    "value.converter": "org.apache.kafka.connect.json.JsonConverter",
    "value.converter.schemas.enable": "false",
    "clickhouseSettings": ""
  }
}
Basic Configuration with Multiple Topics
The connector can consume data from multiple topics
{
  "name": "clickhouse-connect",
  "config": {
    "connector.class": "com.clickhouse.kafka.connect.ClickHouseSinkConnector",
    ...
    "topics": "SAMPLE_TOPIC, ANOTHER_TOPIC, YET_ANOTHER_TOPIC",
    ...
  }
}
Basic Configuration with DLQ
{
  "name": "clickhouse-connect",
  "config": {
    "connector.class": "com.clickhouse.kafka.connect.ClickHouseSinkConnector",
    ...
    "errors.deadletterqueue.topic.name": "<DLQ_TOPIC>",
    "errors.deadletterqueue.context.headers.enable": "true",
  }
}
Using with different data formats
Avro Schema Support
{
  "name": "clickhouse-connect",
  "config": {
    "connector.class": "com.clickhouse.kafka.connect.ClickHouseSinkConnector",
    ...
    "value.converter": "io.confluent.connect.avro.AvroConverter",
    "value.converter.schema.registry.url": "<SCHEMA_REGISTRY_HOST>:<PORT>",
    "value.converter.schemas.enable": "true",
  }
}
JSON Schema Support
{
  "name": "clickhouse-connect",
  "config": {
    "connector.class": "com.clickhouse.kafka.connect.ClickHouseSinkConnector",
    ...
    "value.converter": "org.apache.kafka.connect.json.JsonConverter",
  }
}
Logging
Logging is automatically provided by Kafka Connect Platform. The logging destination and format might be configured via Kafka connect configuration file.
If using the Confluent Platform, the logs can be seen by running a CLI command:
confluent local services connect log
For additional details check out the official tutorial.
Monitoring
ClickHouse Kafka Connect reports runtime metrics via Java Management Extensions (JMX). JMX is enabled in Kafka Connector by default.
ClickHouse Connect MBeanName:
com.clickhouse:type=ClickHouseKafkaConnector,name=SinkTask{id}
ClickHouse Kafka Connect reports the following metrics:
| Name | Type | Description |
|---|---|---|
| receivedRecords | long | The total number of records received. |
| recordProcessingTime | long | Total time in nanoseconds spent grouping and converting records to a unified structure. |
| taskProcessingTime | long | Total time in nanoseconds spent processing and inserting data into ClickHouse. |
Limitations
- Deletes are not supported.
- Batch size is inherited from the Kafka Consumer properties.
- When using KeeperMap for exactly-once and the offset is changed or rewound, you need to delete the content from KeeperMap for that specific topic. (See troubleshooting guide below for more details)
Troubleshooting
"I would like to adjust the batch size for the sink connector"
The batch size is inherited from the Kafka Consumer properties. You can adjust the batch size by setting the following properties (and calculating the appropriate values):
consumer.max.poll.records=[NUMBER OF RECORDS]
consumer.max.partition.fetch.bytes=[NUMBER OF RECORDS * RECORD SIZE IN BYTES]
More details can be found in the Confluent documentation or in the Kafka documentation.
"State mismatch for topic [someTopic] partition [0]"
This happens when the offset stored in KeeperMap is different from the offset stored in Kafka, usually when a topic has been deleted or the offset has been manually adjusted. To fix this, you would need to delete the old values stored for that given topic + partition.
NOTE: This adjustment may have exactly-once implications.
"What errors will the connector retry?"
Right now the focus is on identifying errors that are transient and can be retried, including:
ClickHouseException- This is a generic exception that can be thrown by ClickHouse. It is usually thrown when the server is overloaded and the following error codes are considered particularly transient:- 159 - TIMEOUT_EXCEEDED
- 164 - READONLY
- 203 - NO_FREE_CONNECTION
- 209 - SOCKET_TIMEOUT
- 210 - NETWORK_ERROR
- 425 - SYSTEM_ERROR
SocketTimeoutException- This is thrown when the socket times out.UnknownHostException- This is thrown when the host cannot be resolved.
JDBC Connector
This connector should only be used if your data is simple and consists of primitive data types e.g., int. ClickHouse specific types such as maps are not supported.
For our examples, we utilize the Confluent distribution of Kafka Connect.
Below we describe a simple installation, pulling messages from a single Kafka topic and inserting rows into a ClickHouse table. We recommend Confluent Cloud, which offers a generous free tier for those who do not have a Kafka environment. Either adapt the following examples to your own dataset or utilize the sample data and insertion script.
Note that a schema is required for the JDBC Connector (You cannot use plain JSON or CSV with the JDBC connector). Whilst the schema can be encoded in each message; it is strongly advised to use the Confluent schema registry to avoid the associated overhead. The insertion script provided automatically infers a schema from the messages and inserts this to the registry - this script can thus be reused for other datasets. Kafka's keys are assumed to be Strings. Further details on Kafka schemas can be found here.
License
The JDBC Connector is distributed under the Confluent Community License
Steps
1. Install Kafka Connect and Connector
We assume you have downloaded the Confluent package and installed it locally. Follow the installation instructions for installing the connector as documented here.
If you use the confluent-hub installation method, your local configuration files will be updated.
For sending data to ClickHouse from Kafka, we use the Sink component of the connector.
2. Download and install the JDBC Driver
Download and install the ClickHouse JDBC driver clickhouse-jdbc-<version>-shaded.jar from here. Install this into Kafka Connect following the details here. Other drivers may work but have not been tested.
Common Issue: the docs suggest copying the jar to share/java/kafka-connect-jdbc/. If you experience issues with Connect finding the driver, copy the driver to share/confluent-hub-components/confluentinc-kafka-connect-jdbc/lib/. Or modify plugin.path to include the driver - see below.
3. Prepare Configuration
Follow these instructions for setting up a Connect relevant to your installation type, noting the differences between a standalone and distributed cluster. If using Confluent Cloud the distributed setup is relevant.
The following parameters are relevant to using the JDBC connector with ClickHouse. A full parameter list can be found here:
_connection.url_- this should take the form ofjdbc:clickhouse://<clickhouse host>:<clickhouse http port>/<target database>connection.user- a user with write access to the target databasetable.name.format- ClickHouse table to insert data. This must exist.batch.size- The number of rows to send in a single batch. Ensure this set is to an appropriately large number. Per ClickHouse recommendations a value of 1000 should be considered a minimum.tasks.max- The JDBC Sink connector supports running one or more tasks. This can be used to increase performance. Along with batch size this represents your primary means of improving performance.value.converter.schemas.enable- Set to false if using a schema registry, true if you embed your schemas in the messages.value.converter- Set according to your datatype e.g. for JSON, “io.confluent.connect.json.JsonSchemaConverter”.key.converter- Set to “org.apache.kafka.connect.storage.StringConverter”. We utilise String keys.pk.mode- Not relevant to ClickHouse. Set to none.auto.create- Not supported and must be false.auto.evolve- We recommend false for this setting although it may be supported in the future.insert.mode- Set to “insert”. Other modes are not currently supported.key.converter- Set according to the types of your keys.value.converter- Set based on the type of data on your topic. This data must have a supported schema - JSON, Avro or Protobuf formats.
If using our sample dataset for testing, ensure the following are set:
value.converter.schemas.enable- Set to false as we utilize a schema registry. Set to true if you are embedding the schema in each message.key.converter- Set to “org.apache.kafka.connect.storage.StringConverter”. We utilise String keys.value.converter- Set “io.confluent.connect.json.JsonSchemaConverter”.value.converter.schema.registry.url- Set to the schema server url along with the credentials for the schema server via the parametervalue.converter.schema.registry.basic.auth.user.info.
Example configuration files for the Github sample data can be found here, assuming Connect is run in standalone mode and Kafka is hosted in Confluent Cloud.
4. Create the ClickHouse table
Ensure the table has been created, dropping it if it already exists from previous examples. An example compatible with the reduced Github dataset is shown below. Not the absence of any Array or Map types that are not currently not supported:
CREATE TABLE github
(
    file_time DateTime,
    event_type Enum('CommitCommentEvent' = 1, 'CreateEvent' = 2, 'DeleteEvent' = 3, 'ForkEvent' = 4, 'GollumEvent' = 5, 'IssueCommentEvent' = 6, 'IssuesEvent' = 7, 'MemberEvent' = 8, 'PublicEvent' = 9, 'PullRequestEvent' = 10, 'PullRequestReviewCommentEvent' = 11, 'PushEvent' = 12, 'ReleaseEvent' = 13, 'SponsorshipEvent' = 14, 'WatchEvent' = 15, 'GistEvent' = 16, 'FollowEvent' = 17, 'DownloadEvent' = 18, 'PullRequestReviewEvent' = 19, 'ForkApplyEvent' = 20, 'Event' = 21, 'TeamAddEvent' = 22),
    actor_login LowCardinality(String),
    repo_name LowCardinality(String),
    created_at DateTime,
    updated_at DateTime,
    action Enum('none' = 0, 'created' = 1, 'added' = 2, 'edited' = 3, 'deleted' = 4, 'opened' = 5, 'closed' = 6, 'reopened' = 7, 'assigned' = 8, 'unassigned' = 9, 'labeled' = 10, 'unlabeled' = 11, 'review_requested' = 12, 'review_request_removed' = 13, 'synchronize' = 14, 'started' = 15, 'published' = 16, 'update' = 17, 'create' = 18, 'fork' = 19, 'merged' = 20),
    comment_id UInt64,
    path String,
    ref LowCardinality(String),
    ref_type Enum('none' = 0, 'branch' = 1, 'tag' = 2, 'repository' = 3, 'unknown' = 4),
    creator_user_login LowCardinality(String),
    number UInt32,
    title String,
    state Enum('none' = 0, 'open' = 1, 'closed' = 2),
    assignee LowCardinality(String),
    closed_at DateTime,
    merged_at DateTime,
    merge_commit_sha String,
    merged_by LowCardinality(String),
    review_comments UInt32,
    member_login LowCardinality(String)
) ENGINE = MergeTree ORDER BY (event_type, repo_name, created_at)
5. Start Kafka Connect
Start Kafka Connect in either standalone or distributed mode. For standalone mode, using the sample configurations, this is as simple as:
./bin/connect-standalone connect.properties.ini github-jdbc-sink.properties.ini
6. Add data to Kafka
Insert messages to Kafka using the script and config provided. You will need to modify github.config to include your Kafka credentials. The script is currently configured for use with Confluent Cloud.
python producer.py -c github.config
This script can be used to insert any ndjson file into a Kafka topic. This will attempt to infer a schema for you automatically. The sample config provided will only insert 10k messages - modify here if required. This configuration also removes any incompatible Array fields from the dataset during insertion to Kafka.
This is required for the JDBC connector to convert messages to INSERT statements. If you are using your own data, ensure you either insert a schema with every message (setting _value.converter.schemas.enable _to true) or ensure your client publishes messages referencing a schema to the registry.
Kafka Connect should begin consuming messages and inserting rows into ClickHouse. Note that warnings regards “[JDBC Compliant Mode] Transaction is not supported.” are expected and can be ignored.
A simple read on the target table “Github” should confirm data insertion.
SELECT count() FROM default.github;
| count\(\) |
| :--- |
| 10000 |
Recommended Further Reading
- Kafka Sink Configuration Parameters
- Kafka Connect Deep Dive – JDBC Source Connector
- Kafka Connect JDBC Sink deep-dive: Working with Primary Keys
- Kafka Connect in Action: JDBC Sink - for those who prefer to watch over read.
- Kafka Connect Deep Dive – Converters and Serialization Explained
Using Vector with Kafka and ClickHouse
Vector is a vendor-agnostic data pipeline with the ability to read from Kafka and send events to ClickHouse.
A getting started guide for Vector with ClickHouse focuses on the log use case and reading events from a file. We utilize the Github sample dataset with events held on a Kafka topic.
Vector utilizes sources for retrieving data through a push or pull model. Sinks meanwhile provide a destination for events. We, therefore, utilize the Kafka source and ClickHouse sink. Note that whilst Kafka is supported as a Sink, a ClickHouse source is not available. Vector is as a result not appropriate for users wishing to transfer data to Kafka from ClickHouse.
Vector also supports the transformation of data. This is beyond the scope of this guide. The user is referred to the Vector documentation should they need this on their dataset.
Note that the current implementation of the ClickHouse sink utilizes the HTTP interface. The ClickHouse sink does not support the use of a JSON schema at this time. Data must be published to Kafka in either plain JSON format or as Strings.
License
Vector is distributed under the MPL-2.0 License
Steps
- Create the Kafka
githubtopic and insert the Github dataset.
cat /opt/data/github/github_all_columns.ndjson | kcat -b <host>:<port> -X security.protocol=sasl_ssl -X sasl.mechanisms=PLAIN -X sasl.username=<username> -X sasl.password=<password> -t github
This dataset consists of 200,000 rows focused on the ClickHouse/ClickHouse repository.
- Ensure the target table is created. Below we use the default database.
CREATE TABLE github
(
    file_time DateTime,
    event_type Enum('CommitCommentEvent' = 1, 'CreateEvent' = 2, 'DeleteEvent' = 3, 'ForkEvent' = 4,
                    'GollumEvent' = 5, 'IssueCommentEvent' = 6, 'IssuesEvent' = 7, 'MemberEvent' = 8, 'PublicEvent' = 9, 'PullRequestEvent' = 10, 'PullRequestReviewCommentEvent' = 11, 'PushEvent' = 12, 'ReleaseEvent' = 13, 'SponsorshipEvent' = 14, 'WatchEvent' = 15, 'GistEvent' = 16, 'FollowEvent' = 17, 'DownloadEvent' = 18, 'PullRequestReviewEvent' = 19, 'ForkApplyEvent' = 20, 'Event' = 21, 'TeamAddEvent' = 22),
    actor_login LowCardinality(String),
    repo_name LowCardinality(String),
    created_at DateTime,
    updated_at DateTime,
    action Enum('none' = 0, 'created' = 1, 'added' = 2, 'edited' = 3, 'deleted' = 4, 'opened' = 5, 'closed' = 6, 'reopened' = 7, 'assigned' = 8, 'unassigned' = 9, 'labeled' = 10, 'unlabeled' = 11, 'review_requested' = 12, 'review_request_removed' = 13, 'synchronize' = 14, 'started' = 15, 'published' = 16, 'update' = 17, 'create' = 18, 'fork' = 19, 'merged' = 20),
    comment_id UInt64,
    path String,
    ref LowCardinality(String),
    ref_type Enum('none' = 0, 'branch' = 1, 'tag' = 2, 'repository' = 3, 'unknown' = 4),
    creator_user_login LowCardinality(String),
    number UInt32,
    title String,
    labels Array(LowCardinality(String)),
    state Enum('none' = 0, 'open' = 1, 'closed' = 2),
    assignee LowCardinality(String),
    assignees Array(LowCardinality(String)),
    closed_at DateTime,
    merged_at DateTime,
    merge_commit_sha String,
    requested_reviewers Array(LowCardinality(String)),
    merged_by LowCardinality(String),
    review_comments UInt32,
    member_login LowCardinality(String)
) ENGINE = MergeTree ORDER BY (event_type, repo_name, created_at);
- Download and install Vector. Create a
kafka.tomlconfiguration file and modify the values for your Kafka and ClickHouse instances.
[sources.github]
type = "kafka"
auto_offset_reset = "smallest"
bootstrap_servers = "<kafka_host>:<kafka_port>"
group_id = "vector"
topics = [ "github" ]
tls.enabled = true
sasl.enabled = true
sasl.mechanism = "PLAIN"
sasl.username = "<username>"
sasl.password = "<password>"
decoding.codec = "json"

[sinks.clickhouse]
type = "clickhouse"
inputs = ["github"]
endpoint = "http://localhost:8123"
database = "default"
table = "github"
skip_unknown_fields = true
auth.strategy = "basic"
auth.user = "username"
auth.password = "password"
buffer.max_events = 10000
batch.timeout_secs = 1
A few important notes on this configuration and behavior of Vector:
- This example has been tested against Confluent Cloud. Therefore, the
sasl.*andssl.enabledsecurity options may not be appropriate in self-managed cases. - A protocol prefix is not required for the configuration parameter
bootstrap_serverse.g.pkc-2396y.us-east-1.aws.confluent.cloud:9092 - The source parameter
decoding.codec = "json"ensures the message is passed to the ClickHouse sink as a single JSON object. If handling messages as Strings and using the defaultbytesvalue, the contents of the message will be appended to a fieldmessage. In most cases this will require processing in ClickHouse as described in the Vector getting started guide. - Vector adds a number of fields to the messages. In our example, we ignore these fields in the ClickHouse sink via the configuration parameter
skip_unknown_fields = true. This ignores fields that are not part of the target table schema. Feel free to adjust your schema to ensure these meta fields such asoffsetare added. - Notice how the sink references of the source of events via the parameter
inputs. - Note the behavior of the ClickHouse sink as described here. For optimal throughput, users may wish to tune the
buffer.max_events,batch.timeout_secsandbatch.max_bytesparameters. Per ClickHouse recommendations a value of 1000 is should be considered a minimum for the number of events in any single batch. For uniform high throughput use cases, users may increase the parameterbuffer.max_events. More variable throughputs may require changes in the parameterbatch.timeout_secs - The parameter
auto_offset_reset = "smallest"forces the Kafka source to start from the start of the topic - thus ensuring we consume the messages published in step (1). Users may require different behavior. See here for further details.
- Start Vector
vector --config ./kafka.toml
By default, a health check is required before insertions begin to ClickHouse. This ensures connectivity can be established and the schema read. Prepending VECTOR_LOG=debug can be helpful to obtain further logging should you encounter issues.
- Confirm the insertion of the data.
SELECT count() as count FROM github;
| count |
|---|
| 200000 |